

Polymers are long-chain molecules built from smaller chemical units known as monomers. In Leaving Certificate Engineering, we divide plastics into three distinct groups based on their molecular bonding: thermoplastics, thermosets, and elastomers. Whether a plastic relies on weak secondary attractions or permanent covalent cross-links determines how it behaves when heated, shaping how we form it in industry and how we cut, shape, and join it in the school workshop.
Sources, Synthesis, and Molecular Classification
Raw Materials and Natural Sources
Most commercial plastics begin as crude oil, natural gas, or coal. At the oil refinery, crude oil undergoes fractional distillation to separate different hydrocarbon fractions by boiling point. The light petroleum fraction, known as naphtha, passes into a cracking unit where high temperatures break heavy hydrocarbons into short, reactive monomers such as ethylene and propylene gas. The polymer is then mixed with additives (colour, plasticiser, stabilisers) and supplied in these main forms:
- granules or pellets, for injection moulding, extrusion and blow moulding;
- powder, for rotational moulding, sintering and compression moulding;
- sheet, for vacuum forming and workshop fabrication;
- rod, tube, film and foam;
- liquid resin with a catalyst or hardener, for laminating and resin casting.
Long before synthetic materials arrived, natural polymers served everyday needs. Cellulose taken from wood pulp and cotton fibres gives us cellulose acetate for screwdriver handles. Latex tapped from rubber trees yields natural rubber, while amber is fossilised tree resin that hardened over millions of years.
Polymerisation: Linking the Chains
Plastics form when individual monomer molecules link up into long repeating chains:
- Addition Polymerisation: Monomers containing a carbon-to-carbon double bond, such as ethylene, open that double bond when triggered by a catalyst. They join end-to-end without producing any chemical by-product. Polyethylene, polypropylene, and PVC form through this route.
- Condensation Polymerisation: Two different reactive molecules combine, releasing a small by-product molecule (usually water) at each joint. Nylon, phenolic resin, and polyester resin form through condensation polymerisation.
Thermoplastics and Thermosets
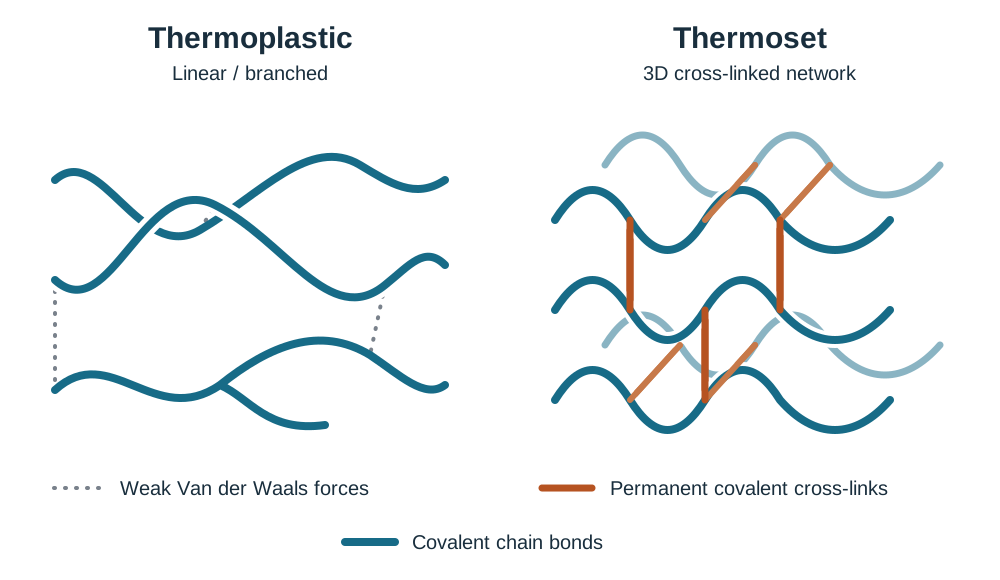
- Thermoplastics: Long, independent polymer chains lie entangled together. Primary covalent bonds hold the atoms together along each chain, but only weak secondary Van der Waals forces hold neighbouring chains to one another. Gentle heat provides enough energy to overcome these secondary bonds. The chains slide freely over each other, allowing the plastic to melt, flow into a mould, and solidify upon cooling. This cycle repeats without destroying the plastic. Familiar examples include polyethylene, polypropylene, PVC, acrylic, and nylon.
- Thermosets: Chemical reactions during moulding lock the chains together with strong, permanent, primary covalent cross-links. This creates a continuous three-dimensional network throughout the component. Because heat cannot melt primary covalent bonds, thermosets stay rigid when hot. If you heat them too much, the polymer network decomposes permanently, leaving charred ash. Classic examples include phenolic resin (Bakelite), polyester resin, and epoxy resin.
Copolymers and Elastomers
A copolymer forms when two or more distinct monomers polymerise together into the same chain. Engineers use this method much like alloying metals. For instance, ABS (Acrylonitrile Butadiene Styrene) unites three monomers: acrylonitrile provides chemical resistance, butadiene adds impact toughness, and styrene gives rigidity and a high-gloss finish.
Elastomers feature coiled polymer chains tied together by a small number of widely spaced cross-links. Pulling an elastomer straightens out the coiled chains. When you let go, the chains coil back up. The cross-links act as anchor points that stop the chains sliding past each other, so the rubber returns to its original size. In vulcanisation, discovered by Charles Goodyear, sticky raw rubber is heated with sulphur. The sulphur atoms form covalent cross-links between the chains, turning gummy latex into durable, elastic tyre rubber.
Common Engineering Plastics: Properties and Uses
Exam questions often name an everyday engineering product and ask you to select an appropriate plastic with two justifying properties, or name a specific polymer and ask for its mechanical traits.
Common Thermoplastics
- Polyethylene (PE): Supplied in two primary densities. Low-Density Polyethylene (LDPE) has branched chains that cannot pack tightly together, making it soft, flexible, and chemical-resistant. We use it for squeeze bottles, wash bottles, and protective films. High-Density Polyethylene (HDPE) has straight chains that pack closely into crystalline regions, creating a stiffer, stronger plastic used for water mains, chemical drums, and heavy-duty buckets.
- Polypropylene (PP): Very light with a density below water, resistant to fatigue from repeated bending, and chemically inert. Because it flexes repeatedly without cracking, designers choose it for one-piece integral hinges on toolboxes and shampoo caps, as well as school chairs and car bumpers.
- Polyvinyl Chloride (PVC): In its pure form, unplasticised PVC (uPVC) is stiff, flame-retardant, and weather-resistant, which makes it standard for guttering, drainage pipes, and double-glazed window profiles. Adding an oily plasticiser pushes the chains apart and weakens secondary bonding, creating flexible PVC for garden hoses and cable insulation.
- Polystyrene (PS): Standard general-purpose polystyrene is hard, clear, and brittle, often seen in clear plastic cases. Toughening it with butadiene rubber creates High-Impact Polystyrene (HIPS), used for vacuum-formed refrigerator liners and toys. Foaming it produces Expanded Polystyrene (EPS), an airy thermal insulator for packaging.
- Acrylic (Polymethyl Methacrylate / PMMA): Highly transparent, rigid, and resistant to outdoor weathering. Sold under names like Perspex, it is brittle and scratches easily. Typical uses include illuminated shop signage, vehicle tail-light clusters, and aircraft windscreens.
- Polytetrafluoroethylene (PTFE): Features an extremely low coefficient of friction, high thermal resistance up to 250 °C, and chemical inertness. It lines non-stick cookware, seals pipe joints as plumber tape, and acts as dry bearings in machinery.
- Cellulose Acetate: A tough, semi-synthetic plastic derived from plant cellulose. It takes a smooth polish and feels tactile in the hand, making it ideal for screwdriver handles and spectacle frames.
- Nylon (Polyamide): Combines high tensile strength, excellent wear resistance, and self-lubricating qualities with a low coefficient of friction, though it absorbs moisture. Engineers specify nylon for spur gears, power tool casings, and machine bushings.
Common Thermosets
- Phenolic Resin (Bakelite): Hard, brittle, flame-resistant, and an exceptional electrical insulator. Because it oxidises dark during synthesis, parts are pressed in black or brown. Common uses include saucepan handles, 3-pin plug bodies, and distributor caps.
- Polyester Resin: Hard and brittle on its own, but laminating it with glass fibres produces Glass-Reinforced Plastic (GRP). When mixed with a catalyst, it cures at workshop temperatures to build boat hulls, canoe bodies, and decorative castings.
- Epoxy Resin: Outstanding adhesion to metals and ceramics, high mechanical strength, and minimal shrinkage during curing. Supplied as a two-part resin and hardener, epoxy forms heavy-duty adhesives such as Araldite, floor screeds, and printed circuit board substrates.
- Polyurethanes: Very versatile thermosets. Formulations range from rigid cavity wall insulation foam and flexible furniture cushions to tough skateboard wheels and hard-wearing floor coatings.
Industrial Forming Processes for Thermoplastics
Industrial production processes shape molten or softened thermoplastics into finished parts. Written exam questions often ask you to describe one of these machines using numbered steps and a clear, fully labelled sketch.
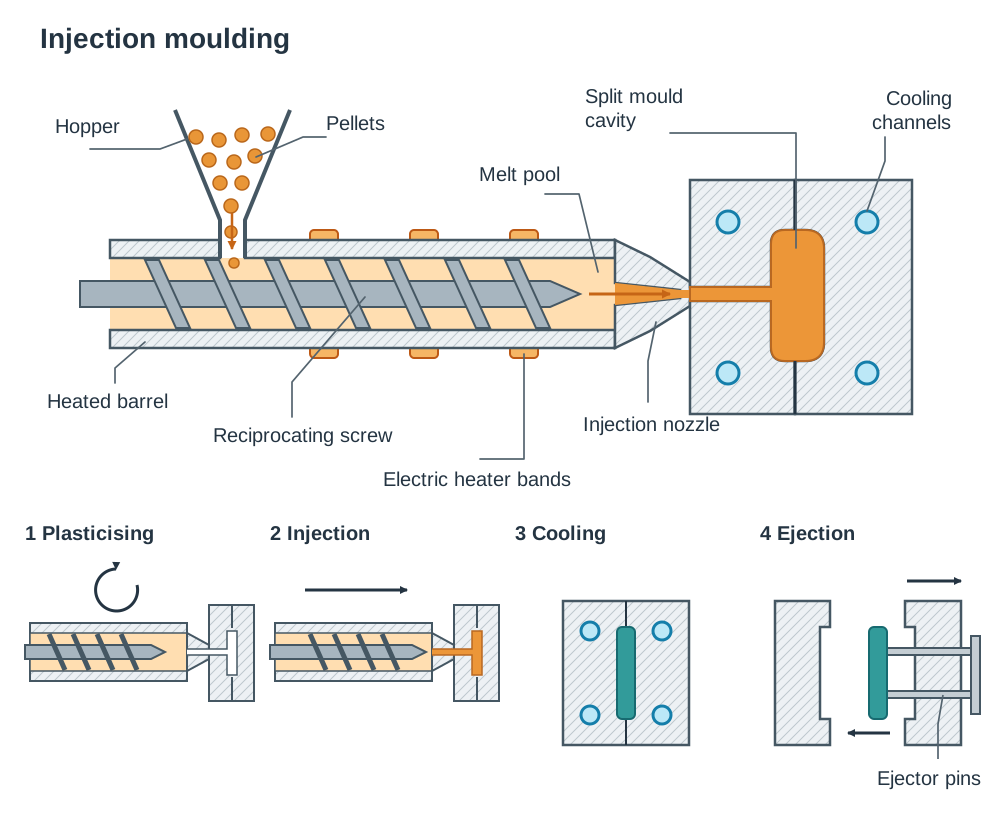
1. Injection Moulding
Used for the automated mass production of complex three-dimensional components with ribs, internal lugs, and varying wall thicknesses, such as safety helmets, kicking tees, and plug covers.
- Step 1 (Feeding): Polymer pellets drop from a hopper into the barrel by gravity.
- Step 2 (Plasticising): An electric motor rotates an Archimedean screw. The turning screw drives pellets forward past external heater bands, where heat and shear friction melt the plastic into a uniform pool ahead of the screw tip.
- Step 3 (Injection): Once enough molten material gathers, the screw stops turning and drives forward hydraulically like a ram, forcing the melt through a nozzle into the clamped split mould cavity.
- Step 4 (Cooling): Hydraulic packing pressure stays on to counteract material shrinkage while internal water channels cool the mould and freeze the plastic.
- Step 5 (Ejection): The mould halves split open, and ejector pins push the solid part into a collection bin.
Sketch Requirements: Label the hopper, heated barrel, electric heater bands, reciprocating screw, injection nozzle, split mould cavity, and ejector pins.
2. Extrusion
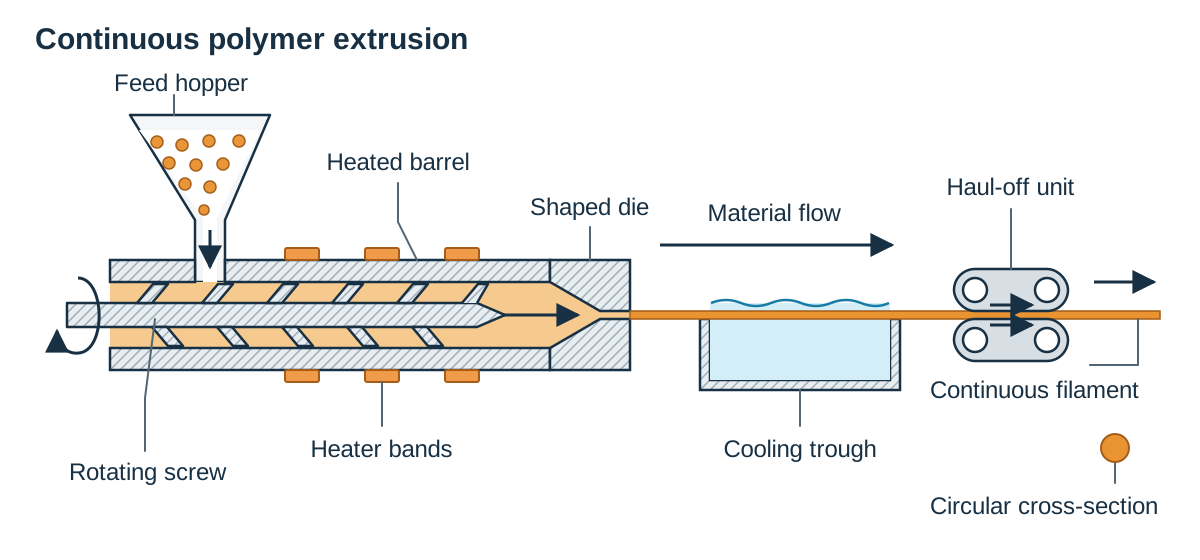
A continuous forming process for manufacturing items with a uniform cross-section, including water pipes, guttering profiles, and 3D printer filament.
- Step 1: Thermoplastic pellets feed from a hopper into a heated steel barrel.
- Step 2: A continuously turning Archimedean screw mixes, compresses, and melts the polymer as it travels forward.
- Step 3: The screw forces the molten stream through a hardened steel die orifice that sets the finished profile shape.
- Step 4: The hot profile travels through a water cooling bath or spray trough to solidify.
- Step 5: Caterpillar pullers draw the profile forward at steady speed toward a cut-off saw or coiler.
Sketch Requirements: Label the feed hopper, heated barrel, rotating screw, heaters, shaped profile die, cooling trough, and haul-off unit.
3. Blow Moulding
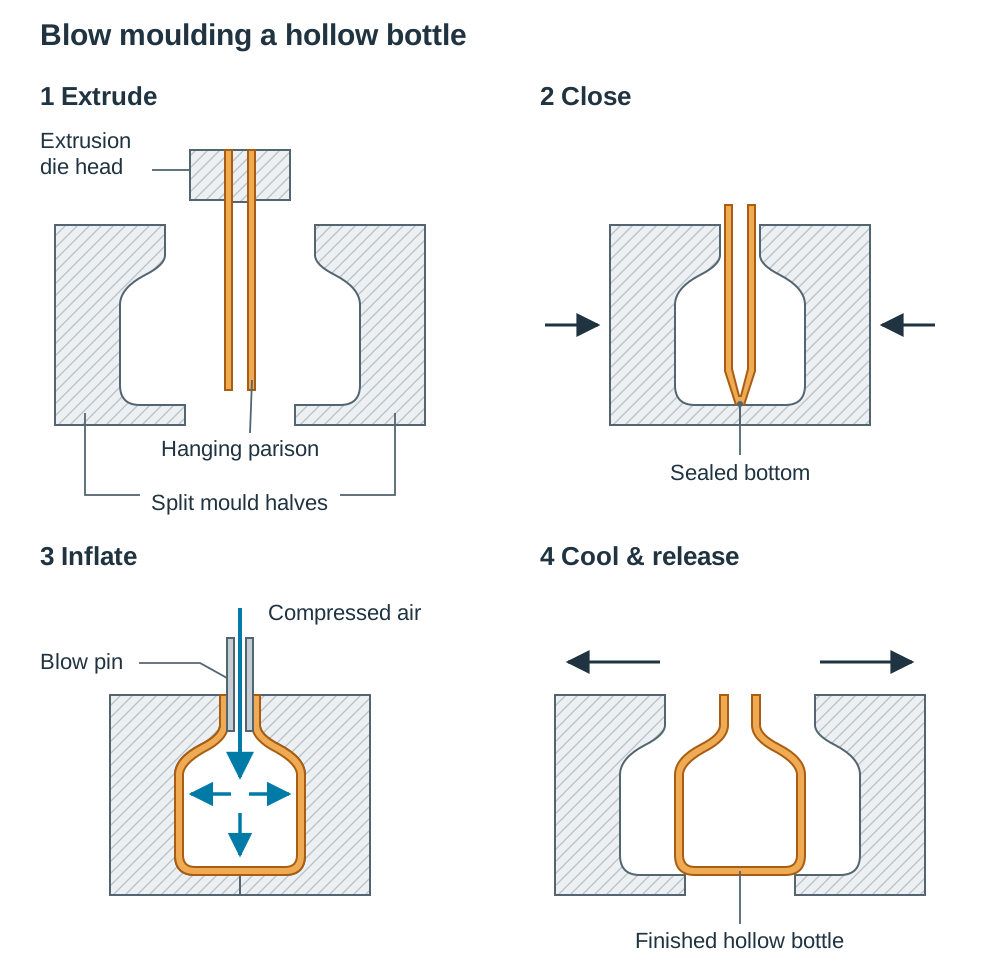
Used to manufacture hollow, thin-walled plastic containers with narrow openings, including milk jugs, drink bottles, and chemical containers.
- Step 1: An extrusion head melts polymer and drops a hot, hollow vertical tube called a parison between open mould halves.
- Step 2: The split mould closes around the parison, pinching and sealing the bottom edge shut.
- Step 3: A blow pin seals into the top neck and injects compressed air, expanding the soft plastic outwards against the cold cavity walls.
- Step 4: The plastic freezes against the cooled metal, air vents out, the mould halves open, and the hollow bottle ejects.
Sketch Requirements: Label the extrusion die head, hanging parison, split mould halves, blow pin air supply, and finished hollow bottle.
4. Vacuum Forming
Used to manufacture shallow, thin-walled products from flat thermoplastic sheet, such as biscuit trays, disposable cups, refrigerator liners, and baths.
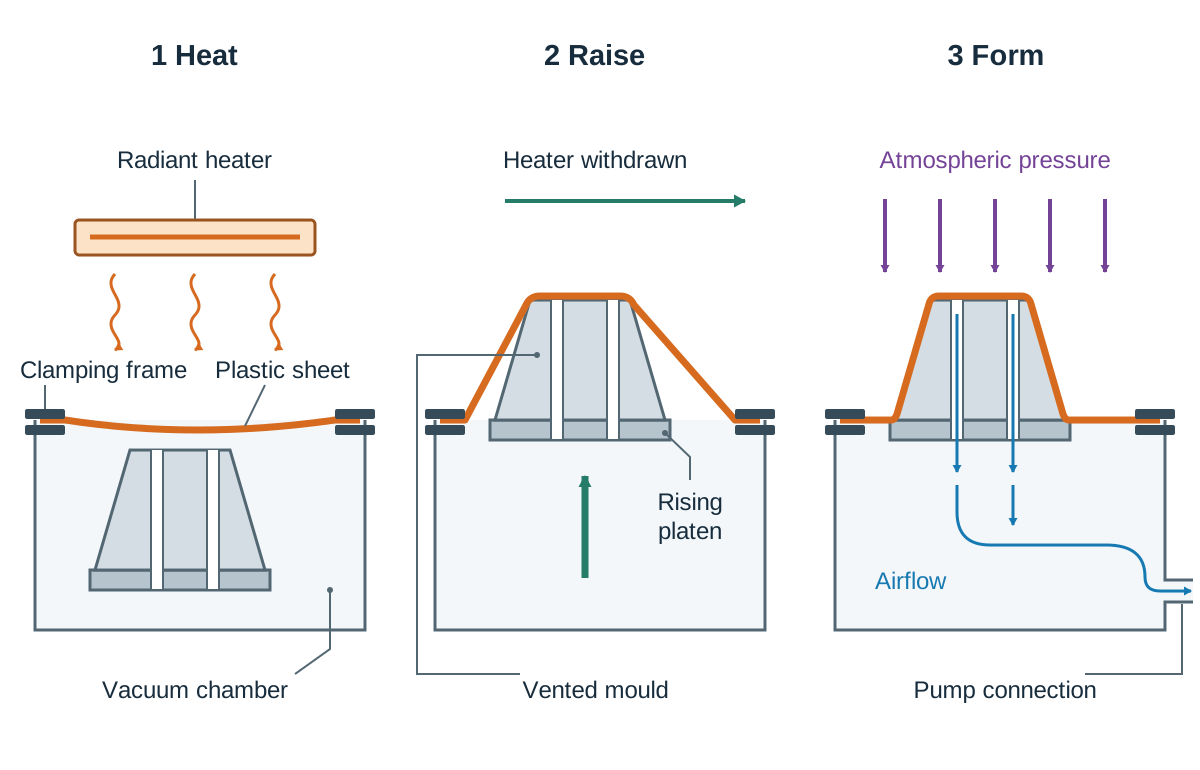
- Step 1: A sheet of thermoplastic (often HIPS or acrylic) clamps securely over the vacuum box.
- Step 2: An overhead radiant heater moves over the sheet until the plastic softens and sags slightly.
- Step 3: The heater retracts, and a shaped mould mounted on a pneumatic platen rises up into the pliable sheet.
- Step 4: A vacuum pump exhausts the air between the sheet and mould. Atmospheric pressure (roughly 100 kPa) pushes the soft sheet tight over the mould contours.
- Step 5: Cooling fans chill the part, a brief reverse blast of air lifts the plastic off the mould, and excess perimeter material is trimmed away.
Sketch Requirements: Label the clamping frame, plastic sheet, radiant heater, mould with vent holes, rising platen, vacuum chamber, and vacuum pump connection.
5. Rotational Moulding
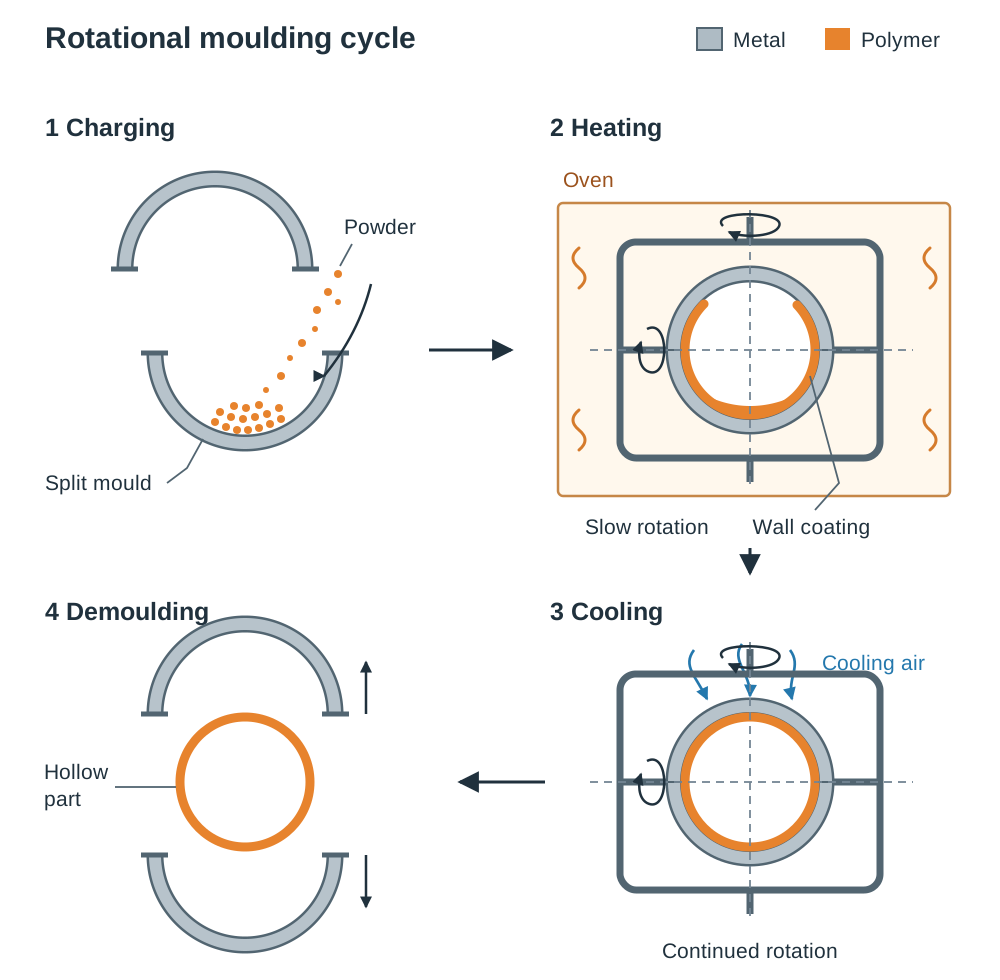
Used to manufacture large, seamless, stress-free hollow products such as road barriers, water storage cisterns, and plastic kayaks.
- Step 1 (Charging): An operator weighs out thermoplastic powder (usually polyethylene) and places it into an open split metal mould.
- Step 2 (Heating): The mould clamps shut and enters an oven where it rotates slowly about two perpendicular axes. The powder melts and coats the inside mould walls evenly under gravity without hydraulic pressure.
- Step 3 (Cooling): While still turning, the mould moves into a cooling bay where air fans or water mists chill the metal until the polymer sets.
- Step 4 (Demoulding): Rotation halts, the mould unbolts, and the hollow part is lifted out.
Thermoset Processing, Calendering, and Laminating
Thermosets must be shaped before they cure, because once the cross-links form the shape is permanent. Some, such as phenolic resin (Bakelite), are cured by heat and pressure in a mould (compression moulding). Others, such as polyester and epoxy resins, are liquids that cure at room temperature once a catalyst or hardener is mixed in (laminating, resin casting).
Compression Moulding
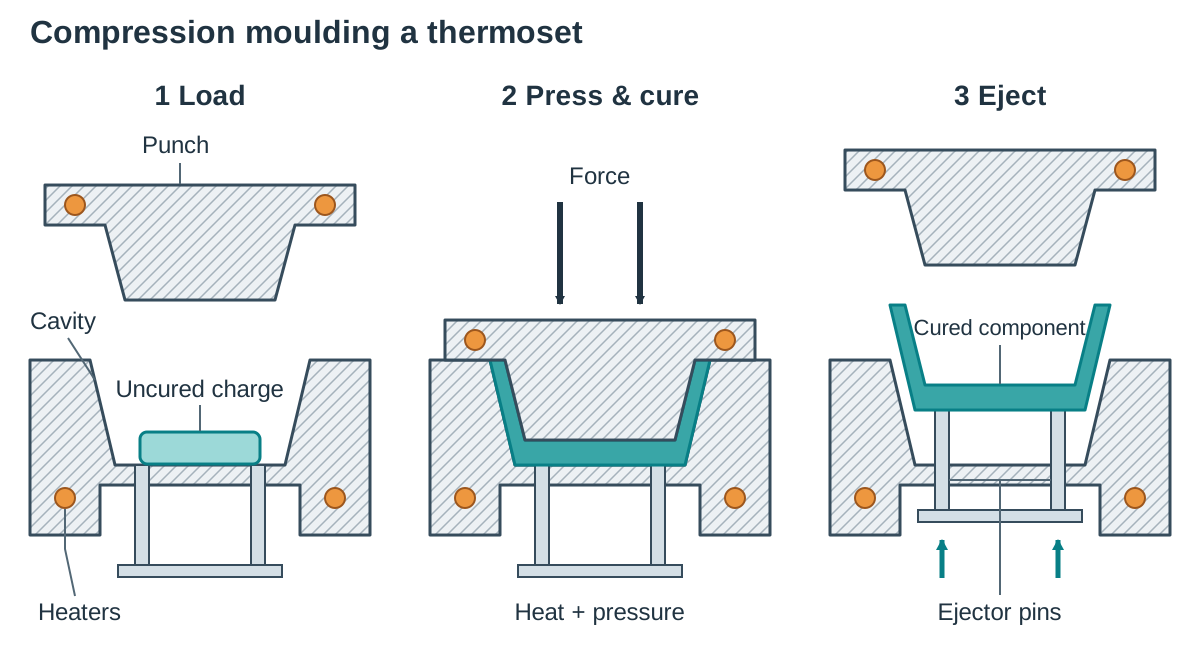
The standard industrial technique for moulding thermosets like phenolic resin (Bakelite) into saucepan handles, distributor caps, and plug tops.
- Step 1: A measured charge of uncured thermoset powder or a pre-pressed pellet rests in the heated cavity of an open steel mould.
- Step 2: A matching heated top punch descends under hydraulic force, squeezing the melting resin into every corner of the cavity.
- Step 3: Heat from the tool and pressure trigger cross-linking, curing the material into a permanent rigid network.
- Step 4: After a set curing time, the press opens and ejector pins lift the hot component clear.
Transfer Moulding
A variation of compression moulding designed for components with intricate geometry or delicate metal inserts, such as electric motor commutators.
- The uncured resin charge sits in an upper transfer pot above the mould cavity.
- A hydraulic plunger forces the softened resin through a narrow runner and gate (sprue) into the closed mould cavity.
- Because the mould is locked shut before resin enters, material flows gently around fragile metal pins without knocking them out of position.
- Once cured, the mould opens and the finished composite part ejects.
Calendering and Spreading
- Calendering: Produces continuous sheets of flexible or rigid PVC for vinyl flooring, shower curtains, and pond liners. Hot plasticised polymer dough passes between pairs of counter-rotating, heated steel rolls. Each roller gap squeezes the sheet thinner until chilled rolls set the final gauge.
- Spreading: Coats woven textiles with a waterproof polymer skin to manufacture imitation leather and heavy tarpaulins. Liquid PVC plastisol pours onto moving cloth, where an adjustable doctor blade scrapes off excess material to leave an even film. The coated fabric then enters an oven to gel and cure.
Laminating (GRP Lay-Up)
Glass-Reinforced Plastic combines an uncured thermoset polyester resin matrix with strong glass fibres to build boat hulls, custom bodywork, and roofing panels.
- Step 1: The open mould surface is cleaned, waxed, and coated with a release agent so the part releases cleanly.
- Step 2: A layer of unreinforced, coloured polyester resin called the gel coat is brushed on to provide a smooth, waterproof outer skin.
- Step 3: Once the gel coat turns tacky, glass-fibre matting (woven or chopped strand) is laid across the mould.
- Step 4: Polyester resin mixed with 1–2 % catalyst (hardener) is stippled thoroughly through the glass fibres with a brush.
- Step 5: A ribbed metal roller rolls across the wet laminate to work out trapped air bubbles and compact the glass reinforcement.
- Step 6: The resin cures via an exothermic reaction at room temperature, after which edges are trimmed.
Working with Plastics in the School Workshop
Identifying Unmarked Workshop Plastics
When sorting through workshop off-cuts, use this sequence of simple workshop tests:
- Touch and Sound: Polyethylene and polypropylene feel waxy and flex without cracking. Acrylic and polystyrene feel rigid and glassy, giving a sharp ring when tapped on a bench.
- Float Test: Place a shaving in a beaker of water. Polyethylene (PE) and Polypropylene (PP) have densities below and float. Nearly all other engineering plastics sink.
- Hot Wire Test: Press a warm soldering iron tip against the plastic. Thermoplastics melt locally, leaving a soft indent; thermosets will not soften, giving off an odour and eventually charring.
- Flame Test (Carry out with tongs over a tin lid under extraction):
- Polyethylene: Burns with a blue flame tipped with yellow, drips burning droplets, and smells like candle wax.
- Polystyrene: Catches fire readily, burns with a sooty yellow flame, and gives off a sweet, floral odour.
- PVC: Difficult to ignite, self-extinguishes when pulled out of the flame, shows a green edge, and gives off sharp, choking fumes.
- Acrylic: Burns steadily with a crackling yellow flame, produces very little smoke, and smells fruity.
Working with Acrylic (PMMA)
Acrylic is widely used in Leaving Certificate project work, but its brittle nature requires specific workshop adjustments:
- Marking Out: Keep the protective paper backing on the sheet while marking lines with a fine pencil or felt-tip pen. Scribing lines directly onto bare acrylic cuts sharp notches that trigger cracking during sawing or drilling.
- Drilling Modifications: Standard twist drills have a 30° positive rake angle. On brittle acrylic, this cutting edge hooks into the plastic, pulls the bit forward, and shatters the underside on breakout. Grind the cutting lips flat to produce a zero or slightly negative rake angle. This changes the cutting action from an aggressive bite to a controlled scraping pass. Always back the work with a flat scrap of hardwood.
- Turning and Milling: Use sharp high-speed steel tools ground with neutral rake and generous clearance angles. Run machines at moderate spindle speeds with light feeds to prevent frictional melting. Cool the cut with compressed air or water. Never apply neat metalworking cutting oils, as they cause immediate chemical crazing (dense micro-cracks).
- Edge Polishing: Sawn acrylic edges can be brought to an optical finish in four stages: draw-file the edge flat, scrape it smooth using a square steel scraper, wet-sand through 240, 400, and 800-grit silicon carbide papers, and polish on a cloth buffing wheel dressed with compound.
- Line Bending: Place the sheet over a strip heater (an exposed resistance wire). The wire heats a narrow strip of plastic until it becomes rubbery. Bend the softened sheet over a timber former jig and hold it clamped until it cools and sets.
Sintering polyethylene
- Heat an aluminium mould to about 200 °C.
- Fill it with PE powder.
- Wait: the powder touching the hot walls fuses into a layer, and a longer time gives a thicker wall.
- Pour out the unfused powder.
- Return the mould to the oven to smooth the inside surface.
- Cool the mould and remove the hollow item.
Casting polyethylene: melt the granules in a heated mould, let the melt cool and solidify, then remove the part.
Resin casting
- Apply release agent to a flexible mould.
- Mix polyester resin with about 1–2 % catalyst, following the maker's instructions.
- Pour in layers, embedding objects on a partly cured layer if wanted.
- Let it cure; the reaction is exothermic.
- Demould the casting and polish it.
Simple mould making: make a pattern from timber or clay, then cast silicone rubber or plaster around it (or machine an aluminium mould). Give the mould tapered sides and a smooth finish so the part releases cleanly.
Workshop Safety Rules
- Always work in a well-ventilated room or under an extraction hood when heating plastics, using solvent cements, or mixing resins to avoid inhaling fumes.
- Wear heat-resistant gloves when handling hot sheet from the oven, strip heater, or vacuum former.
- Wear safety glasses and nitrile gloves when measuring liquid resins and catalysts; organic peroxide hardeners attack skin and eyes.
- Store flammable solvent cements and resin kits in a locked, yellow steel safety cabinet.
Joining of Plastics and Adhesives
How Adhesives Grip Workpieces
Adhesives hold parts together by two distinct mechanisms:
- Mechanical Adhesion: Liquid adhesive flows into microscopic surface irregularities, pores, and scratch marks. When the glue cures and hardens, it forms an interlocking physical key. Abrading surfaces with emery cloth before gluing increases surface area and improves grip.
- Specific (Chemical) Adhesion: Molecular attraction, including secondary Van der Waals forces and chemical bonds, develops between adhesive molecules and workpiece molecules on smooth, close-fitting surfaces.
Common Workshop Adhesives
- Solvent Cements (e.g., Tensol, Dichloromethane): Used exclusively on thermoplastics such as acrylic and rigid PVC. The chemical solvent softens and dissolves the surface polymer chains. Clamping the parts allows these chains to interlock across the joint. As the solvent evaporates, the joint fuses into a solid weld.
- Contact Adhesives: Neoprene rubber dispersed in a fast-drying solvent. Apply a thin film to both faces and wait until tacky. When brought together under pressure, the films bond instantly. Standard for bonding plastic laminates (Formica) to timber worktops.
- Epoxy Resins (e.g., Araldite): Two-part systems of liquid resin and hardener, mixed in the ratio the maker specifies (often equal amounts). They cure chemically with very little shrinkage, forming strong bonds between dissimilar materials like metals, glass, and plastics.
- Cyanoacrylates ("Superglue"): Single-part liquid that polymerises rapidly upon contact with moisture present on workpiece surfaces. Suited to small, tight-fitting joints.
- Hot-Melt Adhesives: Sticks of thermoplastic melted inside an electric glue gun. The molten adhesive wets the joint and sets within seconds as it cools.
Advantages of Adhesive Bonding
- Joins dissimilar materials that cannot be welded, such as bonding aluminium brackets to acrylic sheet.
- Distributes stress evenly over the entire joint area, avoiding the stress concentrations that gather around drilled bolt holes or rivets.
- Keeps external surfaces clean, smooth, and free of screw heads.
- Seals joints completely against air, water, and fuel leaks.
- Adds minimal weight compared to heavy metallic fasteners.
Welding Thermoplastics
Only thermoplastics can be welded, because they can be melted and re-solidified without chemical breakdown. Thermosets cannot be welded.
- Hot-Gas Welding: A 60° V-groove is filed along the joint line. A hot-air gun blows heated gas over the seam while the operator feeds a filler rod of matching plastic into the root. The rod and workpiece faces melt together to build rigid PVC chemical tanks and ducting.
- Hot-Plate Welding: The ends of plastic pipes are pressed against an electrically heated, PTFE-coated hot plate until a molten bead appears. The plate slides away, and the pipe ends are pressed together under pressure until cool. Standard for joining underground polyethylene gas and water pipes.
- Ultrasonic Welding: High-frequency mechanical vibrations (20–40 kHz) applied under pressure create rapid friction at the seam, welding small thermoplastic components together in less than a second.
Polymer Waste Management and Environmental Impact
Waste Disposal Methods
Because synthetic plastics resist natural bacterial decay and weather, discarded polymers persist in the environment. Waste handling follows three main disposal routes:
- Landfill: Burying plastic in landfill uses up ground space and leaves materials that remain intact for centuries. Chemical additives, such as heavy-metal colour pigments and plasticisers, can slowly leach out into local soil and groundwater.
- Incineration (Waste-to-Energy): Burning plastic waste at high temperatures generates steam to drive turbine generators, reducing waste volume by over 90 %. The main drawback is emissions: burning plastics containing chlorine, such as PVC, generates acidic hydrogen chloride gas and dioxins. Modern plants must install lime scrubber filters to clean exhaust gases, and the ash left over must be disposed of safely.
- Mechanical Recycling: Thermoplastics are collected, cleaned, sorted by polymer code, shredded, melted, and extruded into fresh pellets. However, every time a polymer melts, thermal stress and screw shear cause chain scission (snapping long chains into shorter fragments). Because this reduces tensile strength and impact toughness, recycled plastics are usually downcycled into less demanding goods like garden benches, refuse sacks, and drainage pipes. Thermosets cannot be melted down; they can only be ground up into fine filler powder for road asphalt.
The Waste Hierarchy and Bioplastics
   ▲  REDUCE    (Design thinner walls; avoid single-use packaging)
   │  REUSE     (Refillable containers; durable service parts)
   │  RECYCLE   (Mechanical sorting, shredding, downcycling)
   ▼  RECOVER   (Incineration for electrical power)
Engineers follow the 3 Rs Hierarchy: Reduce raw plastic consumption through efficient component design, Reuse robust plastic containers repeatedly, and Recycle clean off-cuts into new goods. In Ireland, introducing the plastic bag levy showed how targeted economic policy can dramatically slash single-use polyethylene consumption.
Bioplastics are manufactured from renewable biomass sources such as corn starch, sugarcane, or cellulose, rather than fossil crude oil. A prominent example is Polylactic Acid (PLA). Producing PLA uses less fossil fuel, and in commercial composting facilities, it breaks down into water and carbon dioxide. In school workshops, PLA filament is preferred for 3D printing because it prints at lower nozzle temperatures, does not warp off the build plate, and avoids the harsh styrene vapours associated with printing ABS.
Key terms
- Monomer
- A small, reactive chemical molecule containing double bonds or functional groups that links together to form a long polymer chain.
- Addition Polymerisation
- A chemical reaction in which unsaturated monomers open their double bonds and join end-to-end without producing any chemical by-product.
- Condensation Polymerisation
- A chemical reaction in which monomers link together to form a polymer while releasing a small by-product molecule, typically water.
- Van der Waals Forces
- Weak secondary intermolecular bonds holding adjacent polymer chains together in thermoplastics, which break under heat and reform on cooling.
- Cross-linking
- Strong primary covalent bonds linking adjacent polymer chains into a permanent three-dimensional network, characteristic of cured thermosets.
- Copolymer
- A polymer produced by polymerising two or more different monomers into the same molecular chain to achieve balanced mechanical properties, such as ABS.
- Plasticiser
- A chemical additive incorporated into rigid plastics that forces polymer chains apart, weakening secondary bonds to make the material flexible.
- Parison
- A hot, hollow extruded tube of thermoplastic that is clamped inside a split mould and inflated with compressed air during blow moulding.
- Vulcanisation
- A process where natural rubber is heated with sulphur to create covalent cross-links between chains, giving elasticity, toughness, and thermal stability.
- Bioplastic
- A polymer synthesised from renewable biological biomass sources, such as corn starch or sugarcane, rather than petrochemical fossil fuels.
- Downcycling
- Reprocessing recycled plastic scrap into lower-grade products because repeated heating cycles break chains and lower mechanical properties.
- Atmospheric Pressure
- The pressure exerted by the surrounding atmosphere (about 100 kPa) that forces a softened plastic sheet over a mould once air beneath is evacuated in vacuum forming.
Check yourself
Which polymer manufacturing process is most suitable for producing a 1,000-litre hollow water storage tank, and why?
Rotational moulding, because it produces large, seamless, stress-free hollow products without high pressure or welded joints.
State two properties of PTFE that make it ideal for non-stick cookware coatings.
An extremely low coefficient of friction (providing its non-stick quality) and high heat resistance up to 250 °C.
Why are tiny vent holes drilled into the recesses of a vacuum-forming mould?
To let air trapped in the recesses escape to the vacuum chamber, so atmospheric pressure can push the soft sheet fully into every corner of the mould.
What is the key chemical difference between addition polymerisation and condensation polymerisation?
Addition polymerisation opens carbon-carbon double bonds to link monomers with no by-products; condensation polymerisation links monomers while releasing a small by-product molecule, typically water.
Why can thermoplastics be welded using a hot-air gun, whereas thermosets cannot?
Thermoplastics soften and fuse when heated because their chains are held by weak Van der Waals forces; thermosets are permanently cross-linked and will char rather than melt when heated.