
On a building site, almost everything that injures people is predictable: falls from height, trench collapse, buried cables, plant striking workers, and the slow damage done by dust, noise and vibration. Site safety is the work of spotting those hazards in advance, controlling them in the right order, and proving in writing that it was done. This note covers the law and the people responsible, then the practical precautions for trenches, scaffolds, roofs, attics and site electrics — the exact material Question 2 asks you to explain in notes and freehand sketches.
Core Principles, Risk Assessment, and the Hierarchy of Control
Every safety plan begins with three fundamental concepts:
- A hazard is anything with the potential to cause harm, injury, or ill health (for example, an open trench, an unshielded circular saw, or wet cement).
- A risk is the likelihood that the hazard will cause harm, combined with how severe that harm could be.
- A control measure is any action or physical device introduced to eliminate the hazard or reduce the risk.
Consider an open foundation trench. The unsupported cut is a major hazard. If you leave it unfenced and unsupported, the risk of a worker falling in or being crushed is very high. If you install a trench box, erect rigid perimeter barriers, and keep excavated spoil back from the lip, the hazard (the deep hole) still exists, but the risk of injury is reduced to an acceptable level.
Carrying Out a Risk Assessment — the Five Steps
When an employer or safety officer plans a task, they follow five ordered steps:
- Identify the hazards for the specific job by inspecting the work area, talking to operatives, and reviewing equipment and material safety data sheets.
- Identify who is at risk, including the operatives doing the task, other trades working nearby, visitors, and vulnerable people such as young apprentices or the public.
- Evaluate the risk by rating the likelihood of an accident and the severity of the injury, ensuring the most dangerous risks are tackled first.
- Decide and record the control measures, working strictly through the hierarchy of control and writing them into the safety statement or site plan.
- Implement, monitor and review by briefing workers before work starts, checking that guards and systems stay in place, and reviewing the plan if weather, ground conditions, or plant change.
The Hierarchy of Risk Control
Control measures must always be chosen in order of effectiveness. Protective clothing is the last line of defence, never the first.
- Elimination: Completely remove the hazard from the design. For example, specify pre-fabricated roof trusses or precast concrete floor slabs assembled at ground level and lifted into place by crane, eliminating work at height.
- Substitution: Replace the dangerous material or method with a safer alternative. For example, use water-based acrylic paints instead of solvent-based gloss to remove toxic fumes, or use an 18 V battery tool instead of a 230 V mains tool.
- Engineering Controls (Isolation): Use physical barriers or equipment to separate workers from danger. Examples include fitting modular steel trench boxes inside excavations, erecting edge protection on scaffolds, and enclosing noisy generators in acoustic baffles.
- Administrative Controls: Change work organisation and procedures. Examples include operating a permit-to-work system for hot works or confined spaces, rotating workers on noisy tools to limit exposure, and delivering regular safety toolbox talks.
- Personal Protective Equipment (PPE): Supply safety gear such as hard hats, high-visibility vests, safety footwear with steel midsoles, and hearing protection. PPE only protects the wearer, relies on correct fitting, and does not remove the hazard.
Applied Example: Cutting Concrete Roof Tiles
- Elimination: Order purpose-made valley and verge tiles directly from the supplier so no cutting takes place on site.
- Substitution: Use a mechanical guillotine tile cutter instead of an abrasive cut-off saw, cutting tiles without generating dust.
- Engineering Controls: Fit the cut-off saw with a water suppression kit or on-tool vacuum dust extraction, and cut inside an enclosed extraction booth.
- Administrative Controls: Set up a designated cutting station away from other trades, and rotate cutting duties to limit exposure time.
- PPE: Issue the operative an FFP3 dust respirator, safety goggles, ear defenders, and gloves.
Legal Framework, Statutory Roles, and Accident Reporting
Site safety in Ireland is governed by two core pieces of legislation: the Safety, Health and Welfare at Work Act 2005 (the primary Act covering general duty of care) and the Safety, Health and Welfare at Work (Construction) Regulations 2013 (secondary legislation covering building operations).
Statutory Roles: PSDP and PSCS
Under the 2013 Construction Regulations, the client must appoint two statutory safety supervisors in writing where a project involves particular risks (such as work at height, excavations, or work near live services) or where more than one contractor is involved:
- Project Supervisor Design Process (PSDP): Appointed at pre-construction stage. The PSDP coordinates designers to eliminate risks before work starts, prepares the preliminary safety and health plan, and compiles the safety file for future building maintenance.
- Project Supervisor Construction Stage (PSCS): Appointed before construction begins on site. The PSCS coordinates contractors, prepares the construction safety plan, verifies worker certifications (Safe Pass and CSCS), and manages overall site safety during the build.
The Safety Statement
Under Section 20 of the 2005 Act, every employer must prepare a written safety statement. Leaving Certificate questions frequently ask for two distinct reasons why a site must have one:
- Statutory Requirement: It is a mandatory legal obligation under the Safety, Health and Welfare at Work Act 2005. Operating without a valid safety statement leaves management liable to prosecution, heavy fines, or closure by the Health and Safety Authority (HSA).
- Proactive Accident Prevention and Cost Reduction: It provides a practical plan to safeguard workers and visitors by identifying task-specific hazards and mandating controls before work starts. This reduces accidents, avoids project delays, and lowers employer liability insurance premiums.
Safe System of Work Plan (SSWP)
While the safety statement sets out general company policy, a Safe System of Work Plan (SSWP) is a visual, task-based checklist filled out on site each day before high-risk activities begin (such as deep excavations, roofing, or working near overhead cables). It breaks the task into stages and uses pictograms so safety rules are understood regardless of language.
Worker Duties and the Safety Officer
Under Section 13 of the 2005 Act, workers hold a statutory duty of care across three main areas:
- Training: Workers must complete mandatory Safe Pass training every four years, hold CSCS cards for specialist plant or scaffolding, and attend site safety inductions.
- PPE: Workers must correctly wear all issued PPE, inspect it before use, and report any damaged items immediately for replacement.
- Vigilance and Reporting: Workers must work safely without reckless behaviour, remain free from drugs or alcohol, and immediately report any defect, hazard, or near miss (an incident that caused no injury but had the potential to do so).
On large sites, the Health and Safety Officer conducts daily site inspections, carries out risk assessments, delivers inductions, and checks PPE compliance.
Accident Records and Reporting to the HSA
- Every accident, dangerous occurrence, and near miss must be recorded in the site accident register.
- If an injury prevents an employee from performing their normal work for more than three consecutive days (not counting the day of the accident), the employer must report it to the HSA within ten days using the online IR1 form.
- A fatal accident or a dangerous occurrence (such as a scaffold collapse, crane failure, or contact with overhead power lines) must be reported to the HSA immediately.
Site Security, Public Protection, Welfare, and Fire Safety
An employer's duty of care extends to the public, especially children, who see an open construction site as a playground.
Protecting the Public and Securing the Site
- Perimeter Hoarding: Erect continuous hoarding or solid fencing at least 2.0 m high around the site boundary to keep unauthorised people out.
- Controlled Entrances: Provide a single lockable entrance gate, kept secured outside working hours, with clear warning signage ('Construction Site — Keep Out').
- Securing Open Hazards: Cover or barricade all excavations at the end of each shift, and remove or lock away ladders so children cannot climb onto scaffolding.
- Plant Security: Park machinery inside the secure compound, remove ignition keys, lock cabs, and lower all excavator buckets and loader arms flat to the ground.
- Public Protection: Install covered pedestrian gantries over public footpaths, use a banksman to guide delivery lorries, and operate wheel-wash facilities to prevent mud on public roads.
Visitor Management
Anyone doing construction work on site must hold a valid Safe Pass card. Casual visitors (such as clients, building inspectors, or architects) do not need Safe Pass, but they must follow four strict controls: sign in at the site office register, receive a visitor safety induction, put on standard PPE (hard hat, high-vis vest, safety footwear), and stay with an authorised escort at all times.
Standardised Safety Signage
Signage relies on standardised shapes and colours to communicate hazards without relying on text:
| Category | Shape | Colour Scheme | Meaning | Site Example |
|---|---|---|---|---|
| Prohibition | Circular | White background, red border, red diagonal bar | Action forbidden | No Unauthorised Entry, No Smoking |
| Warning | Triangular | Yellow background, black border, black symbol | Alerts to danger | Deep Excavation, Overhead Cables |
| Mandatory | Circular | Blue background, white symbol | Compulsory action or PPE | Safety Helmets Must Be Worn |
| Safe Condition | Rectangular | Green background, white symbol | Escape route or first aid | Emergency Fire Exit, First Aid Box |
| Fire Equipment | Rectangular | Red background, white symbol | Firefighting equipment | Fire Extinguisher, Alarm Call Point |
Welfare and First-Aid Facilities
Before construction work starts, the contractor must provide adequate welfare facilities on site: clean sanitary toilets and washbasins with hot and cold running water, soap, and clean towels (vital when handling irritant wet cement); a clean, heated canteen or rest room with seating, drinking water, and facilities to boil water; a drying room with secure lockers for wet clothing; and a fully stocked first-aid box with a trained occupational first-aider on site.
Fire Precautions and Extinguisher Selection
Site fires are caused by hot works (welding, roof torching), poorly stored LPG or fuel, temporary electrical faults, and waste timber. Key precautions include issuing a hot works permit (with a continuous fire watch for one hour after work ends), storing gas cylinders upright in an external, ventilated steel cage, keeping signed fire points clear, and maintaining an assembly point with a roll call taken from the sign-in register.
Matching the correct extinguisher to the fire class is an essential site skill:
- Water (Red band): Use on wood, paper, cardboard, and mineral insulation. Never use on electrical equipment or flammable liquids.
- Foam (Cream band): Use on flammable liquids, paints, and solvents. Never use on live electrical equipment.
- Carbon Dioxide / CO₂ (Black band): Use on live electrical switchboards and power tools. Ineffective outdoors in strong wind.
- Dry Powder (Blue band): Multi-purpose extinguisher suitable for flammable gases (LPG), liquids, and electrical equipment. Avoid in small, enclosed rooms because it limits visibility.
Working at Height: Scaffolding, Ladders, and Domestic Roof Work
Work at height means any work where a person could fall a distance liable to cause personal injury — there is no minimum height below which work is considered safe. Where a fall is possible, always provide a proper working platform in preference to a ladder.
Scaffolding Anatomy and Edge Protection
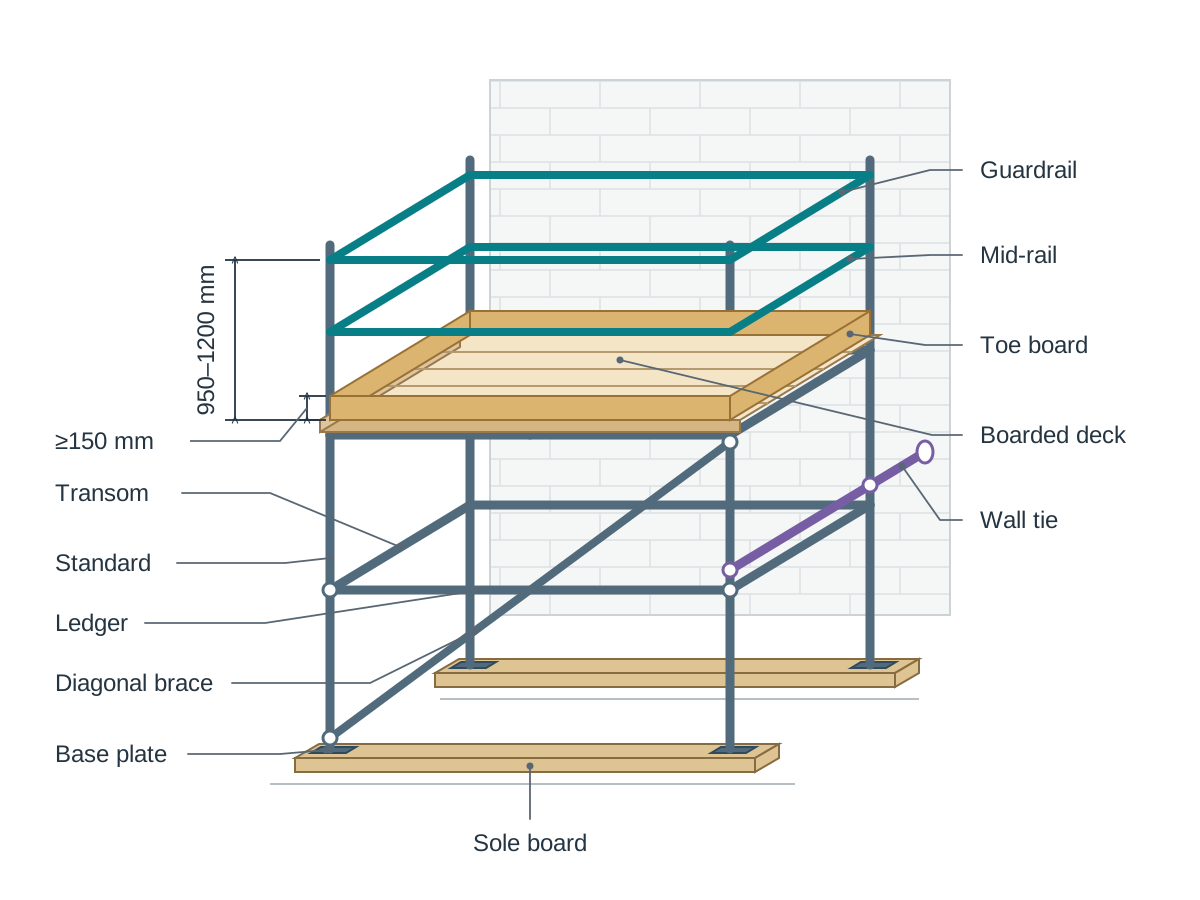
Independent tied scaffolding must be erected and altered only by certified operatives holding a CSCS Scaffolding card:
- Substructure: Scaffold uprights (standards) must rest on steel base plates supported on continuous timber sole boards (minimum 38 mm thick by 225 mm wide) to spread the weight and prevent standards sinking into soft ground.
- Triangulation and Ties: The structure must be stiffened with diagonal facade braces and tied securely into the building masonry using reveal ties, through-ties, or ringbolts to resist sideways racking and wind suction.
- Decking: Platforms must be fully boarded with sound timber scaffold boards, laid flat without gaps or trip hazards, and secured against wind uplift.
- Edge Protection: Working platforms from which a person could fall 2.0 m or more must have a rigid main guardrail fixed between 950 mm and 1200 mm above the deck, an intermediate mid-rail (so no vertical opening exceeds 470 mm), and a continuous toe board at least 150 mm high along outer edges to prevent tools or blocks being kicked off the platform.
Mobile Tower Scaffolds
For short-duration domestic work such as painting fascias or fitting windows, a mobile aluminium tower is used instead of a ladder:
- It must be assembled by a trained person following the manufacturer's manual.
- The working height should not exceed 3 times the smallest base width outdoors; attach outriggers or stabilisers to widen the base.
- Lock all caster wheels before climbing, and use the internal ladder rather than climbing the outside frame.
- A mobile tower must never be moved while anyone or any material is on the platform.
Statutory Inspection Duties
A competent person must inspect scaffolding before first use, after any alteration, after severe weather or impact, and at least once every 7 days. The inspection must be recorded on the official GA 3 form kept on site. Many sites use a Scafftag at the access point: green indicates the scaffold has passed inspection and is safe to use; red means do not use.
Safe Ladder Practice and the 1:4 Rule
Ladders provide access between levels; they are not intended for heavy, prolonged work. When setting up an access ladder:
- Stand the feet on firm, level ground so the ladder cannot rock. If ground is soft, place a timber spreader underneath.
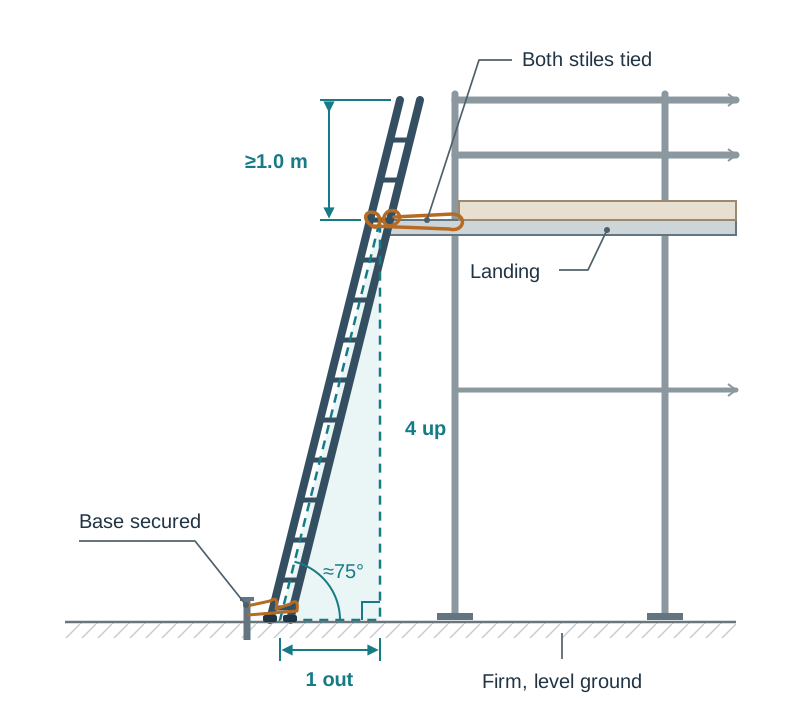
- Secure both stiles by tying them off at the top landing, or foot and stake the base to stop kick-out.
- Set the ladder at the 1:4 rule (1 unit out horizontally for every 4 units of vertical rise). This produces a pitch angle of roughly 75° to the ground.
- The stiles must extend at least 1.0 m above the landing platform to provide a safe handhold while stepping on or off.
Domestic Roofs, Chimneys, and Attics
- Slating and Tiling: Install independent perimeter scaffolding at eaves level, fitted with guardrails and toe boards to arrest a slip. Use a purpose-built roof ladder with a ridge hook that hooks over the roof ridge to spread the worker's weight across the rafters without loading brittle slates or battens. When working on fragile roof sheets (such as fibre-cement or rooflights), lay crawling boards across the purlins.
- Chimney Repairs: Never work from a ladder leaned against a chimney pot. Erect a modular chimney-bracket scaffold around the stack, fully boarded with guardrails and toe boards, and anchor a safety harness with a shock-absorbing lanyard to a secure structural fixing.
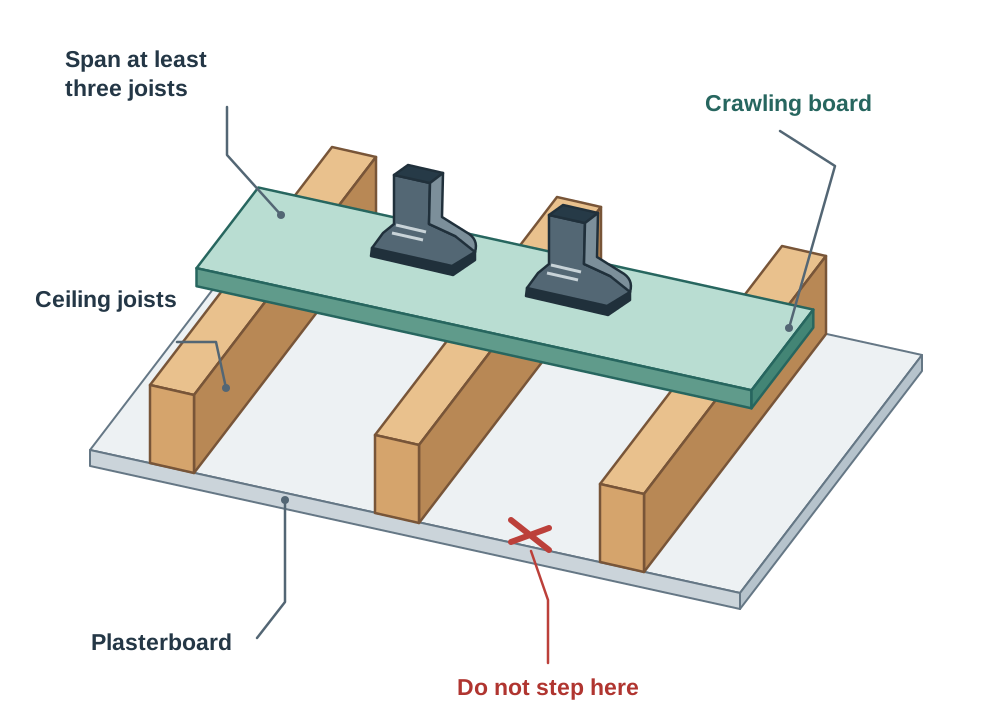
- Attic Retrofitting: Plasterboard ceilings cannot carry a person's weight. Lay continuous crawling boards across at least three ceiling joists to create a secure walkway. Provide low-voltage temporary task lighting, ensure cross-ventilation, and wear an FFP3 dust mask, goggles, and overalls to protect against mineral wool fibres.
What to Draw and Label in an Exam Sketch
- Scaffold Cross-Section: Standard, ledger, transom, diagonal brace, wall tie, base plate, timber sole board, fully boarded deck, main guardrail (950–1200 mm), mid-rail, and toe board (150 mm).
- Ladder Setup: 1:4 setback triangle (annotated '1 out, 4 up, 75°'), top tie to scaffold standard, and 1.0 m projection above the deck.
Excavations, Groundwork, and Buried Services
One cubic metre of damp soil weighs between 1.5 and 2.0 tonnes. A sudden trench collapse will crush or suffocate a worker within seconds. Soil failure happens without warning, especially after rain or when heavy machinery passes near the excavation.
The 1.25 m Support Rule and Support Methods
Under Irish construction safety regulations, any excavation or trench deeper than 1.25 m must have its sides supported or battered back before any worker is permitted to enter. Unsupported vertical trenches deeper than 1.25 m are illegal.
Three main methods protect workers in excavations:
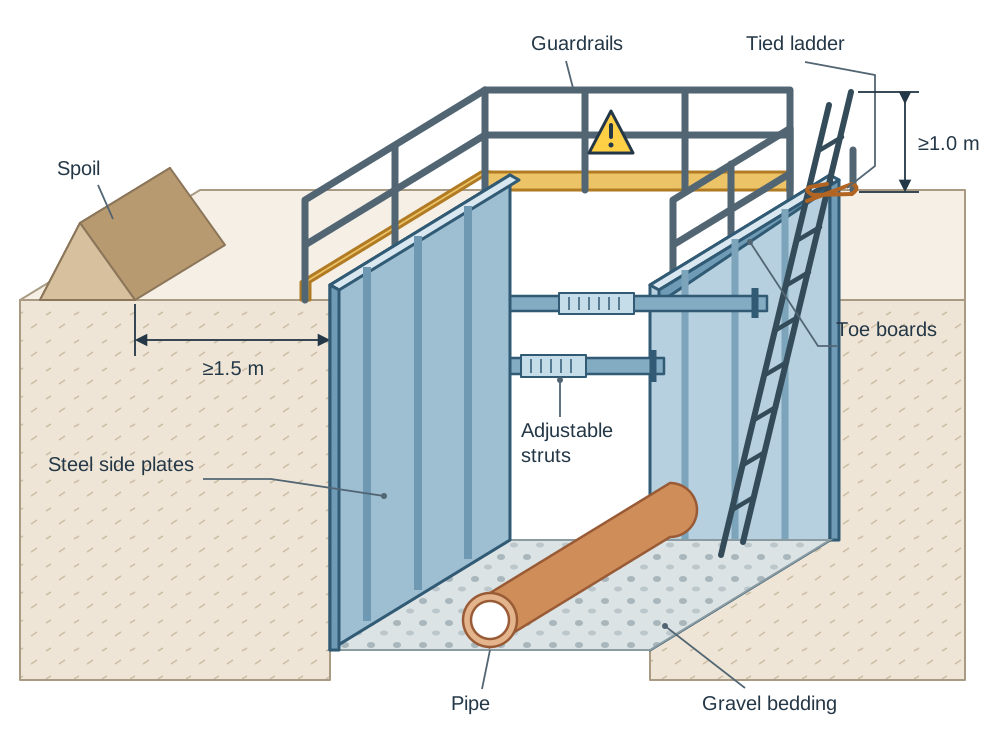
- Trench Boxes: Modular steel or aluminium boxes with rigid side plates held apart by adjustable struts. The excavator digs the cut and lowers the box into position, so workers lay pipes inside a steel shield without touching an unsupported face.
- Timber or Hydraulic Shoring: Vertical steel trench sheets or timber poling boards driven along the trench walls, supported horizontally by walings and adjustable props (struts).
- Battering Back: Sloping the trench sides back to the soil's angle of repose — the steepest natural angle at which that specific soil will stand unsupported. Firm clay may stand at roughly 45°, but loose sand, gravel, made ground, or wet soil must be cut back much flatter. Battering eliminates vertical faces but requires extensive site space.
Critical Trench Precautions
- Spoil Clearance: Excavated soil heaps (spoil), pallets of blocks, and heavy plant must be kept back at least 1.5 m from the trench lip. Placing weight near the edge creates a surcharge load that pushes the trench wall inward and triggers collapse.
- Safe Access and Escape: Securely lashed ladders must be placed inside the supported part of the trench, extending at least 1.0 m above ground level, with enough ladders provided so workers have an immediate escape route.
- Edge Barriers and Signage: Fit rigid perimeter guardrails and warning signs around the open cut to prevent workers, plant, or the public falling into the trench in the dark.
- Inspection: A competent person must inspect the excavation at the start of every shift before workers enter, and again after any fall of earth, collapse, or heavy rain that could weaken the trench sides. The result must be recorded.
Underground Utility Services
Striking buried electrical cables causes fatal flash burns, and hitting a gas main causes fires or explosions. Never rely solely on old utility maps, which are often inaccurate.
Follow this five-step pre-excavation procedure:
- Obtain current underground service maps from utility providers (ESB Networks, Gas Networks Ireland, Uisce Éireann) via the 'Dial Before You Dig' service.
- Have a trained worker scan the entire excavation corridor using an electronic Cable Avoidance Tool (CAT) paired with a Signal Generator (Genny) to locate energised and unenergised metal pipes and cables.
- Mark the confirmed line and depth of services directly on the surface using waterproof spray paint or timber pegs.
- Hand-dig exploratory trial holes carefully using insulated spades with rounded edges. Never use an excavator bucket within 0.5 m of a suspected live service.
- Treat all uncovered pipes and cables as live until the utility provider gives written confirmation that the service is physically isolated.
What to Draw and Label in an Exam Sketch
- Trench Section: Steel trench box side plates, adjustable horizontal struts, pipe bedded in pea gravel on the trench floor, spoil heap set back 1.5 m (with arrowed dimension), rigid guardrail and toe board at ground level, warning sign, and a tied ladder extending 1.0 m above ground.
Electrical Safety and Occupational Health
Mains electricity in Ireland runs at 230 V single-phase AC. On an outdoor construction site, rain, mud, and wet boots drastically lower electrical resistance. If a worker touches a live 230 V conductor in damp conditions, enough electrical current passes across the chest to cause heart failure.
The 110 V Centre-Tapped to Earth (CTE) Principle
Portable mains-powered tools are not permitted to connect directly to a 230 V domestic socket. Instead, power must pass through a yellow step-down transformer that drops the supply to 110 V.
The internal safety principle relies on a centre-tapped to earth (CTE) secondary winding. The midpoint of the secondary transformer coil is connected directly to earth ground. This splits the 110 V supply into two separate lines, each operating at only 55 V relative to ground:
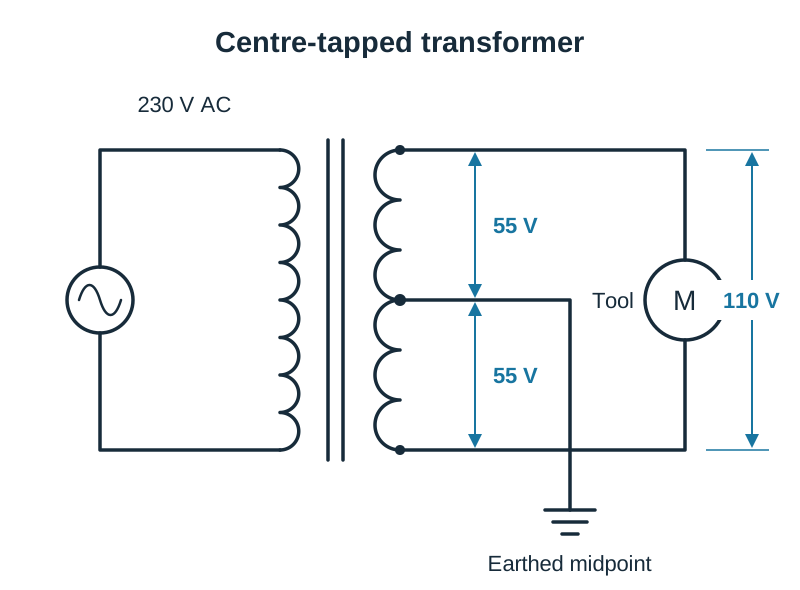
If an operative accidentally cuts through a power lead or damages a tool casing while standing in damp mud, the maximum electrical potential between the live wire and ground is 55 V. At 55 V, the current flowing through a human body is kept below the level that causes fatal heart failure.
Overhead High-Voltage Power Lines
Electricity at high voltage can arc (jump through open air) across a gap without a machine actually touching the cable. Excavator jibs, cranes, and tipping dumpers are at extreme risk.
- Before starting work, contact ESB Networks to identify the line voltage and agree safe clearance distances, or arrange to have the line diverted or de-energised.
- Mark an exclusion corridor along the cables with barriers and warning signs.
- Where site vehicles must cross underneath, build a designated crossing point flanked by timber or fibreglass goalposts with high-visibility warning bunting suspended at the agreed clearance height.
- Station a trained banksman to guide plant operators and prevent machine jibs being raised near the line.
Occupational Health Hazards
Safety also covers chronic health damage caused by daily site exposures:
| Health Hazard | Source on Site | Long-Term Harm | Compulsory Control Measures |
|---|---|---|---|
| Respirable Crystalline Silica Dust | Chasing blockwork, cutting concrete tiles with a disc saw | Silicosis, chronic obstructive pulmonary disease (COPD) | On-tool water suppression or vacuum extraction; wear an FFP3 dust respirator. |
| Wet Cement | Concreting foundations, mixing bricklaying mortar | Severe caustic chemical burns, contact dermatitis | Nitrile gloves, waterproof safety boots, long sleeves; wash splashes immediately. |
| Hand-Arm Vibration | Extended use of breaker drills (kangos), disc cutters | Vibration White Finger (VWF), permanent nerve damage, loss of grip | Low-vibration tools; limit trigger-time limits; anti-vibration gloves. |
| High Noise Levels | Cut-off saws, generators, heavy excavators | Irreversible hearing loss, permanent tinnitus | Fit acoustic baffles around plant; job rotation; wear calibrated ear defenders. |
Manual Handling and Kinetic Lifting Technique
Back strains and musculoskeletal injuries caused by lifting are the most common non-fatal injuries on Irish construction sites. Under the General Application Regulations, every worker undertaking manual handling must receive formal training.
Kinetic Lifting Technique (Six Steps in Order)
When lifting materials manually (such as concrete blocks, bags of cement, or timber joists), operatives must use the kinetic lifting technique:
- Assess the load: Check the weight, shape, and centre of gravity. Plan the route, ensure walkways are clear of trip hazards, and get help or mechanical plant if the load is too heavy or awkward.
- Position the feet: Stand close to the load with feet shoulder-width apart, placing one foot slightly forward beside the load to create a stable, balanced base.
- Bend the knees and keep the back straight: Lower the body by bending the knees, keeping the spine in its natural curve; lift with the powerful leg muscles, not the lower back.
- Get a secure grip: Grip the item with the whole palm of the hand, not just fingertips, and hug the load close to the body before moving.
- Lift smoothly and turn with the feet: Straighten the legs smoothly without jerking. When changing direction, turn by moving the feet rather than twisting the torso while carrying the load.
- Set down safely: Lower the load by bending the knees, keeping the back straight until the load rests securely, and mind fingers when setting it down.
Reducing Manual Handling by Hierarchy of Control
Whenever possible, avoid manual lifting completely:
- Break the load down: specify 25 kg cement bags rather than 40 kg bags.
- Use mechanical handling equipment: transport materials across site using a teleporter, block cart, wheelbarrow, pallet truck, or hoist.
- Plan deliveries: have suppliers drop pallets of blocks and packs of timber directly onto the scaffold or upper floor using a crane or truck-mounted hiab.
Key terms
- Safety Statement
- A mandatory written document under Section 20 of the Safety, Health and Welfare at Work Act 2005 outlining how an employer identifies hazards, implements controls, and manages site safety.
- Safe System of Work Plan (SSWP)
- A practical, task-based visual checklist completed on site before high-risk activities begin to confirm that all required physical controls are in place.
- Hierarchy of Risk Control
- A sequence of safety measures prioritised by effectiveness: elimination, substitution, engineering controls (isolation), administrative controls, and personal protective equipment (PPE).
- PSDP / PSCS
- Project Supervisor Design Process and Project Supervisor Construction Stage; statutory roles under the 2013 Construction Regulations responsible for safety coordination during design and construction.
- Safe Pass
- A mandatory one-day safety awareness training programme run by SOLAS for all construction personnel in Ireland, renewable every four years.
- Construction Skills Certification Scheme (CSCS)
- A certification scheme providing formal competence training and registration for operators of high-risk plant, scaffolding, and specialist equipment.
- Centre-Tapped to Earth (CTE)
- An electrical configuration in 110 V site transformers where the secondary coil midpoint is grounded, limiting the touch voltage between either live line and earth to a maximum of 55 V.
- Trench Box
- A prefabricated steel or aluminium shoring unit lowered into excavations to shield pipelayers and groundworkers from sidewall collapse.
- Battering Back
- The practice of sloping excavation sides back to the soil's natural angle of repose to eliminate vertical faces and prevent collapse.
- Angle of Repose
- The steepest slope at which a loose soil or granular material remains naturally stable without sliding or collapsing.
- Surcharge Load
- Any downward force applied near the edge of an excavation, such as spoil heaps or heavy machinery, which increases lateral pressure and triggers wall collapse.
- Guardrail
- A rigid horizontal rail fitted between 950 mm and 1200 mm above a working platform to prevent workers from falling over the edge.
- Toe Board
- A continuous vertical safety barrier at least 150 mm high fitted along the edge of a scaffold platform to prevent tools and loose materials from falling off.
- Sole Board
- A timber plank (minimum 38 mm x 225 mm) placed under scaffold base plates to spread vertical standards loads over soft or uncompacted ground.
- Cable Avoidance Tool (CAT) and Genny
- An electronic scanning receiver (CAT) used with a signal transmitter (Genny) to trace and pinpoint buried metallic pipes and live or dead electrical cables.
- Roof Ladder
- A specialized lightweight ladder fitted with a curved ridge hook that sits over the roof ridge to distribute a worker's weight safely across rafters when slating or tiling.
- Crawling Board
- A timber board or staging laid across purlins or ceiling joists to distribute body weight safely over fragile roof coverings or unfloored attic spaces.
- Near Miss
- An unplanned event that caused no injury or damage, but had the clear potential to do so; reporting near misses allows root causes to be fixed before an accident occurs.
- Banksman
- A trained site operative who guides machine drivers and delivery lorries safely during reversing, blind lifts, and movements near overhead hazards.
- Competent Person
- An individual with sufficient training, practical knowledge, and experience to safely inspect equipment (such as scaffolds and excavations) and identify risks.
Check yourself
What are two distinct reasons why every construction site must maintain an active Safety Statement?
First, it is a statutory legal requirement under Section 20 of the Safety, Health and Welfare at Work Act 2005. Second, it proactively identifies hazards to prevent accidents, reduce project downtime, and lower insurance premiums.
At what depth does an excavation legally require side support or battering back?
Any depth exceeding 1.25 metres.
Why does a 110 V centre-tapped to earth (CTE) transformer limit shock voltage to a maximum of 55 V?
The secondary winding is grounded at its midpoint, dividing the 110 V supply into two 55 V lines relative to earth, which is below the threshold that causes fatal heart failure.
What are the required heights for the main guardrail and the toe board on a working platform?
The main guardrail must be fixed between 950 mm and 1200 mm above the deck, and the toe board must be at least 150 mm high.
Under what three headings is a construction worker's statutory duty of care evaluated?
Safety training (holding Safe Pass and CSCS), Personal Protective Equipment (wearing, checking, and reporting defects), and Vigilance (following safety rules, working sober, and reporting hazards and near misses).
A scaffold platform is 4.4 m high. Using the 1:4 rule, how far out from the scaffold face must the foot of an access ladder sit?
4.4 m ÷ 4 = 1.10 metres.
How often must scaffolding be inspected by a competent person, and where is the inspection recorded?
At least once every 7 days (and before first use, after alterations, or adverse weather), recorded on the statutory GA 3 form.
When must an accident on site be formally reported to the Health and Safety Authority (HSA)?
When an employee is injured and unable to carry out their normal work for more than three consecutive days (excluding the day of the accident), or immediately in the case of a fatality or dangerous occurrence.
Which fire extinguisher should be used on live electrical equipment, and which type must never be used on it?
Use a Carbon Dioxide (CO₂, black band) or dry powder (blue band) extinguisher; never use a water extinguisher (red band) on live electrics.