
In Leaving Certificate Construction Studies, the practical and project components make up exactly half of the total marks at Higher Level: 300 out of 600 marks. While students often concentrate heavily on the written paper (Part I, 300 marks), the four-hour Practical Skills Test (Part II, 150 marks) and the Coursework Project with its portfolio and experimental records (Part III, 150 marks) carry equal weight. Doing well in these two parts takes more than a tidy pair of hands. You must understand the mechanical principles of woodworking tools, the structural justification for joint selection, disciplined layout from true datums, rigorous laboratory testing of construction materials, workshop safety legislation, and systematic reporting.
Examination Structure and Assessment Overview
At Higher Level, Construction Studies assesses theoretical understanding, bench craftsmanship, and scientific inquiry across three components:
- Part I — Written Examination (300 marks / 50%): A three-hour paper. Question 1 is a compulsory drawing question carrying a large share of the marks; the remaining questions cover construction theory, building services, heritage, and the environment. The syllabus is primarily related to domestic buildings.
- Part II — Practical Skills Test (150 marks / 25%): A four-hour bench examination held in your own school on a date set by the State Examinations Commission in the weeks before the written papers. Candidates receive working drawings prepared in accordance with BS 1192 and timber blanks to mark out, cut, fit, and assemble traditional joinery joints under exam conditions.
- Part III — Coursework Project and Portfolio (150 marks / 25%): An independent project completed during senior cycle and submitted in the final term. It comprises a manufactured physical artefact, an accompanying design and research portfolio, and documented experimental assignments carried out under teacher supervision.
Because Parts II and III account for 50% of the aggregate grade, consistent workshop practice, proper tool maintenance, and structured portfolio records are vital.
Workshop Tools, Sharpening, and Safety Legislation
The syllabus requires an understanding of how woodworking tools function mechanically, rather than merely memorising tool names:
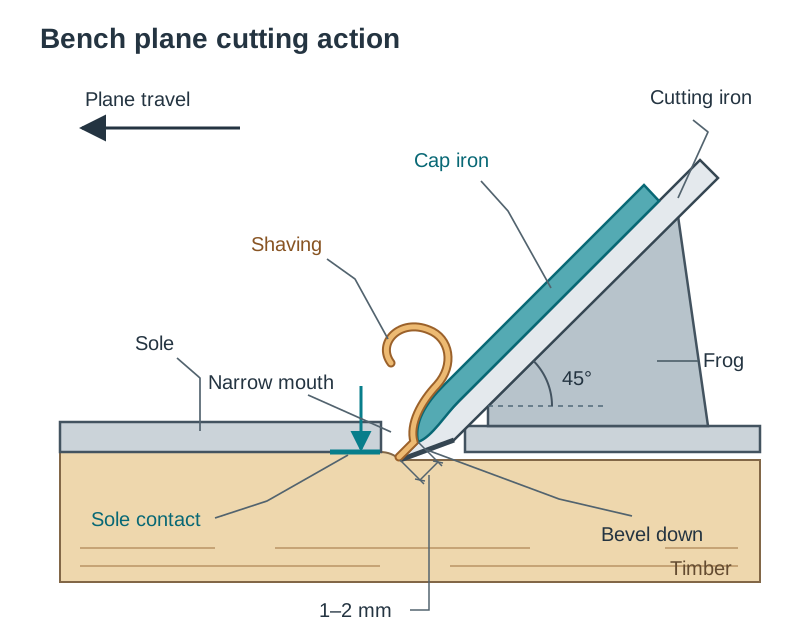
- Bench Plane: The cutting iron is bedded bevel-down on an inclined frog (typically at ). The cap iron (chipbreaker) is screwed to the flat, unbevelled back of the cutting iron, on the upper side as fitted, with its curved leading edge set about 1 mm to 2 mm behind the cutting edge (about 0.5 mm for fine smoothing). As the shaving lifts, it strikes the curved face of the cap iron and is bent and broken. This prevents the shaving from levering upward and tearing the wood fibres ahead of the cut. A narrow mouth opening provides downward pressure on timber fibres immediately before the cutting point, preventing tear-out.
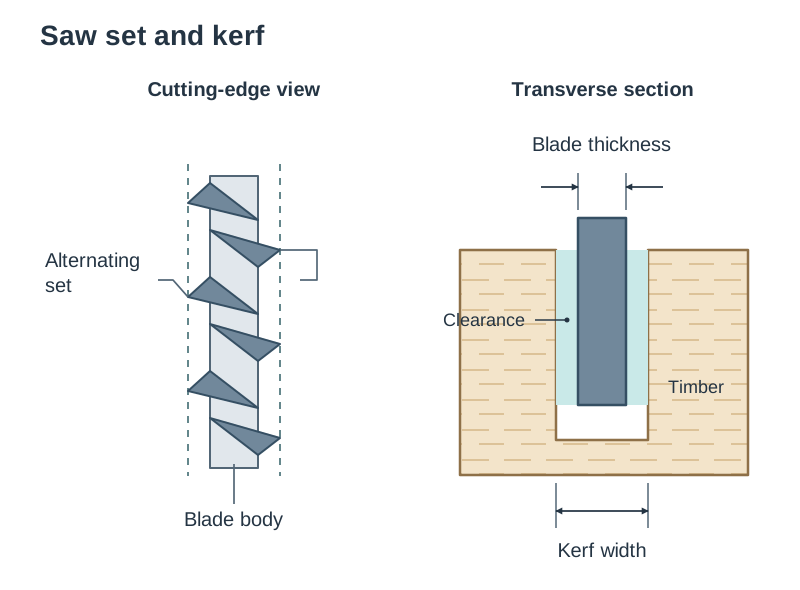
- Saws and Kerf: Hand saws have teeth that are bent alternately left and right. This offset is called the set. It cuts a slot called a kerf that is slightly wider than the saw blade itself, which prevents friction and binding in the cut. Rip saw teeth act like a row of miniature chisels filed straight across the front () to pare wood fibres along the grain. Crosscut saw teeth feature knife-pointed, bevelled edges designed to slice and sever timber fibres cleanly across the grain.
- Chisels: A chisel acts as a wedge. Bevel-edged chisels have angled sides that allow them to reach into tight corners, such as dovetail sockets. Mortise chisels have thick, heavy, rectangular cross-sections designed to withstand heavy blows from a wooden mallet and resist levering forces when clearing waste from a mortise.
Sharpening Cutting Irons
- Primary Grinding (): The primary bevel is ground on an abrasive wheel or coarse stone at to create clearance behind the cutting edge. Quench carbon steel blades in water frequently during grinding; if the edge overheats and turns blue, its temper is drawn, leaving the steel soft.
- Secondary Honing (): The working edge is formed on an oilstone or waterstone by holding the blade at a steeper angle. This secondary micro-bevel produces a sharp, durable cutting edge quickly without having to abrade the entire primary bevel.
- De-burring: Honing pushes a microscopic wire burr over the flat back of the blade. Lay the back of the blade perfectly flat against the fine stone and polish it gently until this burr breaks off cleanly.
Workshop Safety and Legislation
Examiners reward the exact statutory vocabulary: a hazard is anything with the potential to cause harm; the risk is the likelihood of that harm occurring and its severity; a risk assessment identifies hazards and sets out control measures; a safety statement is the written document required under the Safety, Health and Welfare at Work Act 2005 that records the hazards, the risk assessments, and the plan to control them, naming the responsible individuals.
Personal Protective Equipment (PPE): Safety glasses or goggles, ear defenders, dust mask (essential for MDF and hardwood dust), steel-toe footwear, and close-fitting overalls. Never wear gloves, loose clothing, or jewellery near rotating machinery, and keep long hair tied back.
Machine and Power Tool Rules:
- Check cables, plugs, and casings for damage before use; operate on a 110 V transformer supply or via a residual current device (RCD).
- Verify that all guards are fitted, correctly adjusted, and locked.
- Use a push stick whenever fingers come within 300 mm of a circular saw blade; ensure the riving knife and crown guard are adjusted.
- Secure the workpiece firmly with cramps or vices before cutting; never feed material with the cutter rotation on a router.
- Isolate the power supply before changing blades, adjusting fences, or clearing blockages.
Part II: Bench Routine, Testing for Accuracy, and Time Management
Success in the four-hour practical test relies on following a disciplined bench routine from start to finish:
Ordered Bench Routine
- Component verification: Check all supplied timber blanks against the cutting list on the examination paper to verify cross-sections, lengths, and quantities before making any cuts.
- Datum selection: Inspect the timber faces. Mark the truest flat surface as the face side with a looped pencil mark, and the truest square edge as the face edge with a caret (an inverted V) whose point touches the face side mark. Putting both marks together at the same corner shows at a glance which two surfaces you must measure and gauge from.
- Setting out: Scribe shoulder lines using a sharp marking knife and try square held against the datum faces. A knife line severs wood fibres and forms a positive physical recess that guides the saw and paring chisels. Scribe mortise and tenon cheek lines using a mortise gauge set to the chisel width.
- Mark the waste: Lightly hatch every piece of waste with pencil as soon as you finish marking out so you do not accidentally remove a tenon cheek, lap, or dovetail pin.
- Sawing and paring: Saw strictly on the waste side of the scribed knife line, leaving half the knife line visible on the finished piece. Hold the tenon saw at roughly to start the cut, dropping the blade horizontal as you meet the shoulder line. When clearing mortises and housings, chop from both faces toward the centre to prevent tear-out on the reverse side.
- Dry assembly: Assemble all components dry without glue, tapping with a wooden mallet and scrap wood blocks to prevent bruising the timber surfaces.
Holding and Supporting Work, and the Use of Jigs
Safe, accurate joinery relies on selecting the appropriate holding or supporting device:
- Bench vice with soft jaws: Clamps work firmly for sawing and paring while soft timber liners prevent crushing dressed faces.
- Bench hook: Supports timber on the bench and provides a solid shoulder to saw against during crosscutting.
- Bench stop: Anchors boards flat against planing thrust without cramping.
- Sash cramps: Apply strong, parallel clamping pressure across framed assemblies and edge-to-edge glued boards.
- G-cramps: Hold work down securely to the benchtop, always fitted with scrap timber packing blocks to avoid surface bruising.
- Shooting board: Supports work at a true or angle while a finely set try or jointer plane squares edges and end grain.
- Mitre box: Guides a backsaw at a precise or angle across mouldings and small rails.
A jig is a purpose-made workshop device that holds and locates the workpiece and/or guides the cutting tool so that identical operations can be repeated accurately. For example, an MDF fence-and-batten jig clamped across carcase sides guides a router or saw to cut several stopped housing joints at identical spacings. In exam questions, justify using a jig by citing its key benefits: guaranteed accuracy, high repeatability, elimination of cumulative measuring errors, increased production speed, and enhanced operator safety by keeping hands away from cutters.
Testing for Accuracy as You Work
Check every step before moving on; an error carried forward cannot be corrected later.
| What you are testing | Tool | How to check |
|---|---|---|
| Is the face side flat? | Steel straight edge | Sight underneath along the length, across the width, and diagonally in both directions |
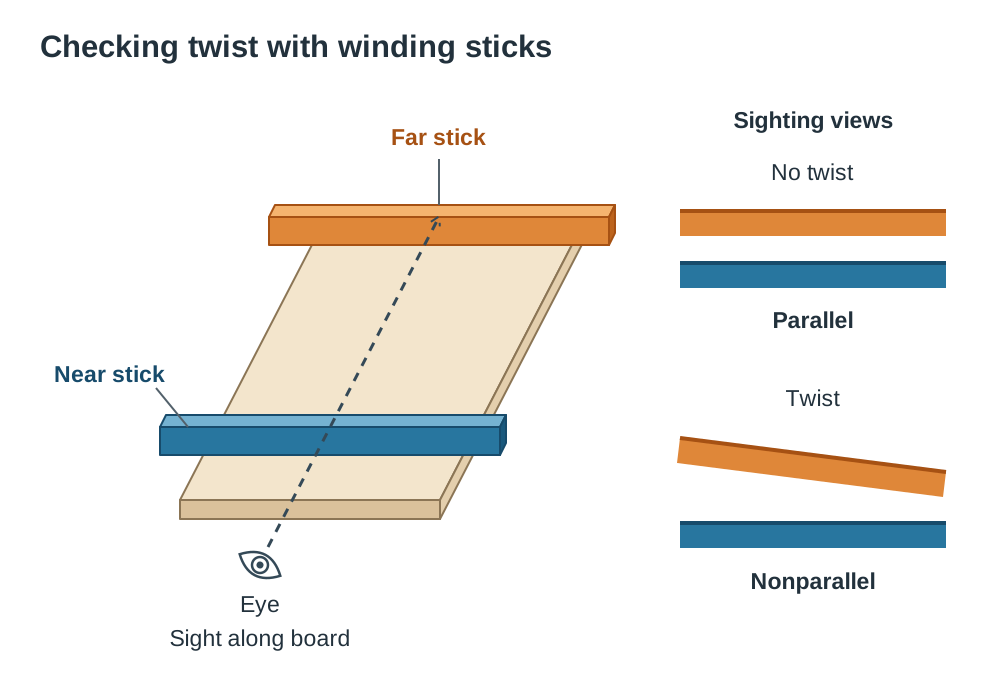
| Is the face side free of twist? | Pair of winding sticks | Place one stick at each end and sight across the top edges; they must align parallel |
| Is the face edge square to the face side? | Try square | Stock held against the face side, blade against the edge, held up to the light at multiple points |
| Is the piece the right thickness and width? | Marking gauge / Vernier | Gauge from the face side and face edge only |
| Is the assembled frame square and flat? | Rule and try square | Opposite sides equal, both diagonals equal, and frame sits flat on the bench with no rocking |
| Is a shoulder joint tight? | Dry assembly / sight | No gap visible against the light along the shoulder line |
Time Management in the Practical Test
- First 10 minutes: Read the drawing thoroughly, verify timber dimensions, and check off parts against the cutting list.
- Next 2 hours: Mark out all joints accurately from datum surfaces, hatch waste, and cut the primary joints.
- Next 1 hour: Pare joints to fit, chop housings and mortises, and test components in dry assembly.
- Next 40 minutes: Clean up internal faces with a finely set smoothing plane, assemble, check squareness across diagonals, and ease sharp arrises lightly.
- Last 10 minutes: Check component orientation, ensure your examination number is clearly stamped or written as instructed, and clean the bench.
- Key rule: An incomplete but accurately cut joint earns far more marks than a rushed, inaccurate joint. Never saw on the pencil line to save time, and leave setting-out lines visible on the timber to demonstrate accurate marking technique.
Joinery Selection, Setting-Out Rods, and Adhesives
Joint selection must be justified using the four syllabus criteria: strength, resistance to stress and strain, ease of assembly, and decorative effect.
| Joint Type | Typical Application | Selection Justification |
|---|---|---|
| Mortise and Tenon | External doors, window sashes, framing | Exceptional resistance to racking and twisting; large long-grain to long-grain gluing area. |
| Haunched Mortise and Tenon | Top rail of panelled doors, casements | The haunch prevents the rail from twisting while leaving solid timber above the mortise to prevent the stile from splitting out at the end. |
| Through Dovetail | Carcase corners, box construction | Resists being pulled apart mechanically even if glue fails; interlocked pins and tails provide high tensile strength and decorative end-grain contrast. |
| Lap (Half-Blind) Dovetail | Drawer fronts | High tensile resistance against pulling open; the joint is concealed on the front face of the drawer. |
| Stopped Housing | Shelving in bookcases, cabinets | Downward shelf load is carried directly by timber bearing rather than glue shear; stopped shoulder conceals the joint at the front face. |
| Bridle Joint | Open frames, roof truss apexes | Strong shear resistance; easier to saw and inspect than a closed mortise, though end grain remains exposed. |
| Halving Joint | Partition framing, internal bracing | Quick to set out and assemble; weak in bending unless mechanically fastened. |
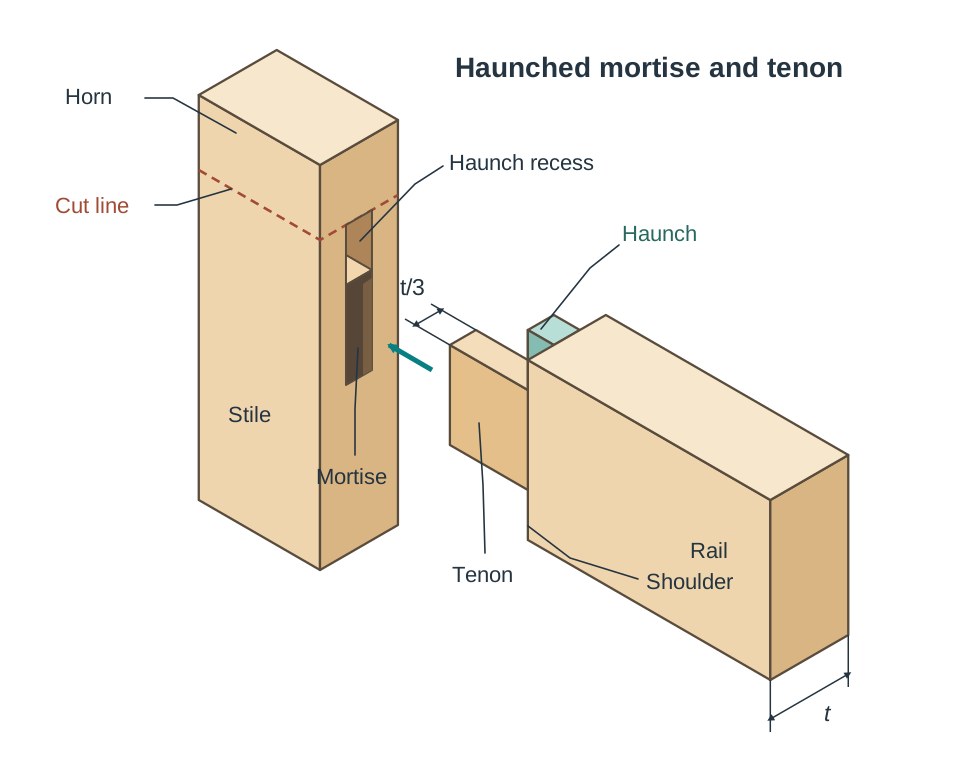
Proportions for the Haunched Mortise and Tenon
When sketching this joint, show standard joinery proportions and label all component parts:
- Tenon thickness: One-third () of the timber thickness.
- Tenon width: Not more than five times its thickness; wider rails are divided into two tenons or haunched.
- Haunch depth: Commonly one-third () of the rail width.
- Haunch length: Equal to the tenon thickness.
- Horn: The stile is left slightly longer than required during cutting and assembly to reinforce the open mortise against splitting while cramping. The horn is sawn flush after the glue has cured.
The Setting-Out Rod
A setting-out rod is a full-size () drawing produced on a stable timber board or sheet material showing the exact cross-sections, heights, widths, and joint profiles of a project. Instead of measuring parts individually from paper drawings with a rule, shoulder lines and mortise limits are transferred directly from the rod to mating components with a try square and knife. This prevents cumulative measuring errors and ensures opposite members match perfectly.
Wood Adhesives: Properties and Selection
Adhesives are selected based on moisture resistance (Class D1/D2 for dry interiors, D3 for humid interiors, D4 for exterior exposure), open assembly time, gap-filling ability, and curing method:
- Polyvinyl Acetate (PVA): Standard interior PVA is clean, non-toxic, and suitable for internal carcases (D2). Exterior PVA (Class D3/D4) provides water resistance for outdoor joinery.
- Polyurethane (PU): Moisture-curing adhesive with an exterior Class D4 rating. It reacts with moisture in timber, foaming slightly to bridge small gaps. Ideal for external gates, doors, and garden furniture.
- Urea-Formaldehyde: A thermosetting powder resin mixed with water. Provides a rigid, creep-resistant glue-line with a long open working time, making it ideal for complex curved laminating and veneering.
- Contact Adhesive: Rubber-based adhesive applied to both faces, dried to tack, and bonded instantly on contact without cramping. Used for fixing plastic laminates to manufactured boards.
- Epoxy Resin: A two-part resin and hardener system that cures without shrinkage. Completely waterproof, excellent gap filler, and bonds timber to metal, glass, and masonry.
Model selection response: For an external oak gate, select a polyurethane adhesive because it provides a fully waterproof Class D4 bond, cures by reacting with moisture in the wood, and offers enough open time to cramp a large structural frame.
Board Jointing, Manufactured Boards, and Surface Finishing
Joining Boards Edge to Edge
Wide surfaces such as table tops, desktop slabs, and carcase sides are produced by gluing narrow boards edge to edge. Always alternate the growth-ring orientation (annual rings curving up on one board, down on the next) so that any cupping cancels out across the overall width.
| Joint Method | How It Works | Selection Justification |
|---|---|---|
| Rubbed Joint | Edges planed dead straight and square; glue applied and boards rubbed together to squeeze out excess glue and air. | Quick, requires no extra material; relies entirely on glue line, requiring a perfectly true edge. |
| Tongued and Grooved | A tongue machined on one edge fits a matching groove on the adjoining board. | Increases gluing surface and aligns board faces flush during cramping. |
| Loose Tongue | A groove is cut into both edges and a separate plywood spline is inserted. | Same alignment benefits as T&G without reducing board width; uses a single cutter setup. |
| Dowelled Joint | Matching holes are bored into both edges and fluted beech dowels are glued in. | Cheap and strong; requires a dowelling jig to guarantee alignment. |
| Biscuit Joint | Compressed oval beech biscuits placed into slots cut by a biscuit jointer. | Rapid, self-aligning; biscuit expands upon absorbing glue moisture, locking the joint. |
Manufactured Boards: Properties and Storage
Manufactured boards overcome natural timber defects, provide large dimensionally stable sheets, and make efficient use of wood waste:
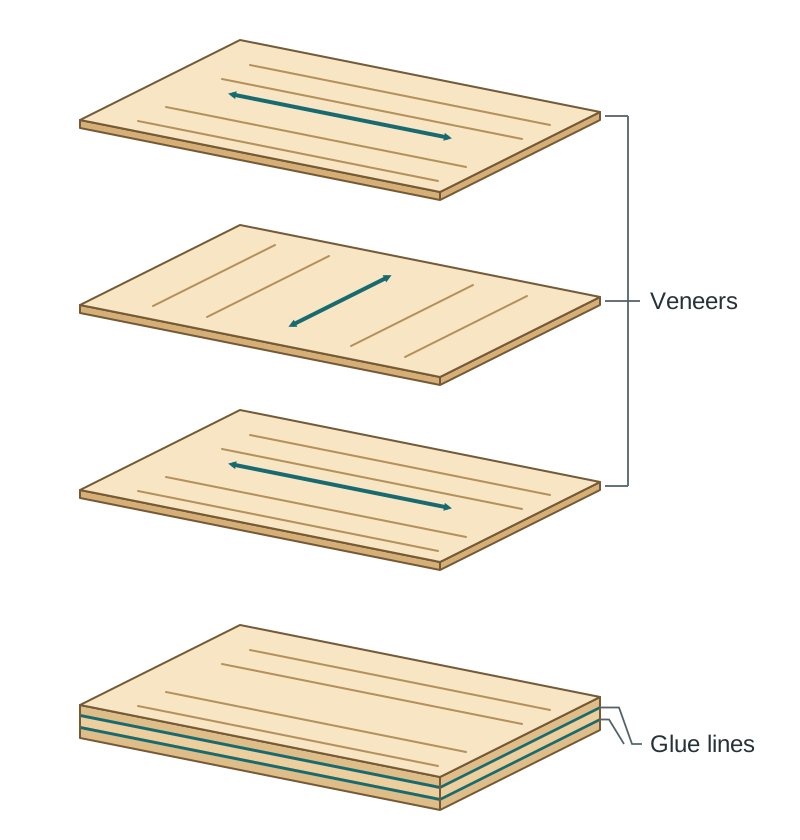
- Plywood: Constructed from an odd number of thin veneer layers glued with alternating grain directions (). This cross-grain construction balances shrinkage, making plywood equally strong in both directions and resistant to splitting. Exterior grades use waterproof adhesives (WBP / Weather and Boil Proof).
- Medium Density Fibreboard (MDF): Made from broken-down wood fibres bonded with synthetic resin under heat and pressure. It has no grain, machines smoothly on edges, and provides a flat paint substrate. Because cut edges are porous, they must be sealed with a primer or PVA wash before painting to prevent uneven paint absorption and fibre swelling.
- Chipboard (Particleboard): Made from wood chips bonded with resin. Cheap and flat, commonly used with melamine facing for kitchen carcases and tongue-and-groove flooring. Screws hold poorly into raw chipboard edges; use knock-down fittings or solid timber lippings.
- Oriented Strand Board (OSB): Composed of layered, cross-oriented wood strands pressed with exterior resins. Widely used for structural wall and roof sheathing.
- Blockboard: A core of solid softwood strips sandwiched between two veneer faces. Excellent longitudinal stiffness for long bookcase shelves and desktop spans; core strips must run along the span length.
Storage: Sheet materials must be stored flat, face to face, on level bearers spaced closely to avoid sagging, raised off damp floors in a dry, ventilated store. Storing boards leaning on edge causes permanent bowing. Solid converted timber is stacked in level tiers separated by wooden spacers called stickers, placed directly in vertical alignment to allow air circulation and prevent distortion.
Surface Preparation and Finishing
Finishes protect timber from moisture changes, dirt, wear, and UV sunlight, while enhancing appearance.
Preparation Steps:
- Remove cramps and scrape away surplus glue while rubbery; cured glue seals timber pores and leaves unsightly pale patches under stains.
- Plane and scrape all faces to remove machine ripples and gauge lines. Knife or gauge lines left on show faces will remain permanently visible under clear finishes.
- Sand through progressively finer abrasive grits (120 grit 180 grit 240 grit), rubbing strictly along the grain. Cross-grain sanding leaves scratches that show up under stains and varnishes.
- Lightly ease (arris) all sharp edges with sandpaper to prevent finishes from thinning or chipping on sharp corners.
- Dust down thoroughly and wipe with a tack cloth or white spirit.
Common Finishes:
- Polyurethane varnish / lacquer: Hard, clear, highly water-resistant coating. Applied in two or three thin coats, de-nibbing lightly with 320 grit abrasive paper between coats.
- Finishing oils (Danish, tung, linseed): Penetrate wood fibres rather than forming a surface film. Simple to apply and repair, giving a natural low-sheen finish, but requires periodic reapplication.
- Paint system: Exterior joinery requires a multi-coat system: knotting compound over resinous knots, primer to seal the wood, undercoat to build body, and topcoat for weather and UV protection.
- Wood stains: Formulated to colour the wood only; stains offer no surface protection and must be sealed with clear varnish or oil.
Seasoning, Timber Defects, and Structural Grading
Seasoning of Timber
Seasoning is the controlled drying of freshly felled timber to reduce its moisture content to match the conditions of its final service environment. Freshly felled green timber has a moisture content well over . As it dries, it reaches the fibre saturation point (approximately moisture content), where all free water within the cell cavities has evaporated. Further drying removes bound water from the cell walls, causing the wood to shrink.
Shrinkage is uneven: timber shrinks roughly twice as much tangentially (along the annual growth rings) as it does radially (across the growth rings), while shrinkage along the grain length is negligible. This differential shrinkage causes flat-sawn boards to cup away from the heart of the log.
- Air Seasoning (Natural): Timber is stacked in open-sided sheds on level bearers with stickers between layers. Cheap and low-energy, but slow (roughly one year per 25 mm of timber thickness) and cannot reduce moisture below roughly in the damp Irish climate.
- Kiln Seasoning (Artificial): Timber is dried inside an insulated chamber with controlled temperature, humidity, and forced air circulation. Fast (days to weeks), reduces moisture content to any required specification (e.g. for heated interiors), and kills insects and fungi. Rushing the process can cause defects like case-hardening or honeycomb checking.
Typical Equilibrium Moisture Content (EMC) in Service:
- Continuously heated domestic interiors:
- Intermittently heated interiors:
- External joinery (windows, doors):
- Structural carcase timbers and roofs:
Timber Defects to Identify and Sketch
- Bow: Curvature along the face of a board from end to end.
- Spring: Curvature along the edge of a board from end to end.
- Cup: Curvature across the width of a board.
- Twist (Wind): A spiral distortion where opposite corners do not lie in the same plane.
- Shakes: Splits along the grain caused by growth stresses, frost, or drying tension (e.g. heart shake, star shake, ring shake).
- Knots: Portions of branches enclosed by subsequent growth. Live (sound) knots are firmly intergrown; dead (loose) knots are surrounded by dark bark rings, weaken timber in tension, and can fall out.
Structural Timber Grading
Irish structural carcassing timber is graded to ensure strength and safety in load-bearing construction. Timber is graded either visually by a certified inspector or mechanically by passing it through a bending-stress machine. Graded timber is stamped with its strength class (commonly C16 for general framing or C24 for heavier structural spans), species code, moisture condition, and certification body mark.
Part III: Project Categories, Assessment Factors, and Portfolio Layout
Each candidate manufactures one project selected from three official categories:
- Building Detail: A physical scale model or full-size construction artefact incorporating a minimum of three distinct craft practices (for example: timber stud framing, masonry cavity blockwork, and lead sheet flashing or slate roofing). It must be accompanied by a written report.
- Building Science Project: An investigative physical apparatus, test rig, or functional model that explores a scientific principle related to construction craft practice (such as a load-testing frame for roof trusses, or a solar thermal collector). It must be accompanied by a written report.
- Written/Drawn Project: An architectural research study examining vernacular building traditions, historic conservation, or elements of the built environment. This option must be supported by an element of practical work, such as a scale model or a full-size craft detail taken from the subject under investigation (e.g. a section of thatch, a sash window corner, or a lime-rendered wall panel).
Official Assessment Factors
The syllabus lists six factors that are taken into consideration when projects and coursework are assessed. Make sure your portfolio gives the examiner clear evidence of each one:
- Manipulative skills: Precision of joints, cleanliness of cuts, accurate sizing, and quality of surface finish.
- Selection, care, and maintenance of equipment: Choice of appropriate hand tools and machines, safe workshop practice, and evidence of sharp cutting edges.
- Plan of procedure: A logical schedule of work prepared before starting, detailing tasks, time allowances, and quality checks.
- Simple experiments and material testing: Supervised testing to compare building materials or structural details (e.g. timber moisture content, brick absorption, adhesive shear strength).
- Conclusions and practical evaluation: Honest reflection on tolerances achieved, difficulties encountered, how problems were solved, and proposed design improvements.
- Presentation of work: Clear layout, neat lettering, BS 1192 drawings, labelled sketches, and annotated progress photographs.
Portfolio Structure
Organise your design portfolio in the logical sequence an examiner reviews:
- Title page, design brief, and statement of intent.
- Research, precedent studies, and analysis of existing solutions.
- Three or four annotated design ideas evaluated against the brief.
- Detailed drawings of chosen solution to scale (BS 1192 conventions with dimensions and title block).
- Complete component cutting list.
- Written plan of procedure.
- Coursework experiment reports with calculations and conclusions.
- Dated progress photographs with explanatory captions.
- Final photographs of the completed artefact from multiple viewpoints.
- Critical evaluation and conclusions.
Coursework Plan of Procedure Format
A plan of procedure is prepared before cutting timber. Set it out as a structured table:
| Step | Operation | Tools / Equipment | Time Allocated | Safety & Quality Checks |
|---|---|---|---|---|
| 1 | Prepare working drawings and setting-out rod | Drawing board, rule | 2 hours | Verify dimensions against the brief |
| 2 | Prepare cutting list and select timber | Rule, marking gauge | 1 hour | Check for knots, shakes, and warp |
| 3 | Crosscut timber blanks to rough lengths | Hand crosscut saw | 1 hour | Support timber on sawing stool; add 25 mm |
| 4 | Plane face side and face edge | Jack plane, try square | 2 hours | Check flat with straight edge, square with try square, test wind |
| 5 | Mark out joints from setting-out rod | Marking knife, mortise gauge | 1.5 hours | Gauge from datum faces only; hatch waste |
| 6 | Cut mortises, tenons, and housings | Tenon saw, mortise chisel | 3 hours | Saw on waste side of knife line; chop from both faces |
| 7 | Dry assemble, clamp, and check squareness | Sash cramps, rule | 1 hour | Measure diagonals; check shoulders tight |
| 8 | Glue-up, sand, and apply finish | Cramps, abrasive paper, finish | 2 hours | Wipe excess glue; sand along grain to 240 grit |
Note on Individual and Joint Work
Candidates should submit individual assignments and projects. In cases where candidates collaborate on joint coursework, each candidate must keep complete, independent records of the entire project and of every experimental assignment. Submitting a single shared folder between two students puts both candidates at risk of losing marks.
Coursework Laboratory Experiments and Reporting Format
Candidates must carry out experimental assignments under close teacher supervision and record them in the portfolio. The syllabus list of experiments is an illustrative guide, not an exhaustive checklist. Core investigation areas include timber moisture content, porosity and water absorption of masonry, aggregate grading and voids, and concrete slump testing.
Standard Report Structure for Coursework Experiments
Examiners mark experiment reports against a clear scientific structure. Use these seven headings for every experiment write-up:
- Title and Aim: A single sentence defining what is being tested or compared (e.g. "Aim: To determine and compare the 24-hour cold water absorption of a clay brick, a concrete block, and an aerated concrete block.").
- Apparatus and Materials: A complete list of equipment, specifications, and sample sizes (electronic balance readable to 0.1 g, drying oven at , water tank, calipers, test specimens).
- Labelled Diagram: A clear, annotated sketch illustrating the experimental set-up.
- Method: Numbered, sequential steps written in the past tense and impersonal voice ("The samples were placed in a drying oven..."), stating the practical reason for each step.
- Results: A structured table containing column headings and units of measurement. Always record raw readings, not just final calculations.
- Calculation and Conclusion: State the formula, substitute figures with units, calculate the final result, and write one or two sentences explaining the direct architectural consequence of the finding.
- Precautions and Sources of Error: List at least two practical precautions taken to maintain accuracy (such as drying to constant mass, wiping standing surface water with a damp cloth rather than a dry cloth, and using the same balance throughout).
Key terms
- Face Side and Face Edge
- The two primary reference datum surfaces planed flat and square to each other on a timber workpiece, from which all measuring, marking, and gauging originate.
- Cap Iron
- The curved steel plate screwed onto the flat, unbevelled back of a plane iron, set 1 mm to 2 mm behind the cutting edge to bend and break shavings, preventing grain tear-out.
- Kerf
- The width of the cut slot produced by a saw blade, created wider than the blade thickness by the alternating set of the teeth to prevent binding.
- Setting-Out Rod
- A 1:1 full-size drawing produced on a board showing exact heights, widths, and joint profiles, used to transfer measurements directly to timber members without cumulative errors.
- Cutting List
- A structured schedule listing every timber component required for a project, including part names, quantities, finished dimensions, sawn machining allowances, and species.
- Equilibrium Moisture Content (EMC)
- The moisture level at which timber neither gains nor loses moisture from the surrounding atmosphere; typically 8% to 10% for centrally heated domestic interiors in Ireland.
- Fibre Saturation Point
- The stage in timber drying (around 28% to 30% moisture content) where all free water in cell cavities has evaporated and bound water begins leaving cell walls, initiating shrinkage.
- Winding Sticks
- A pair of straight, parallel wooden battens placed across opposite ends of a board and sighted across to check for twist or wind in a timber face.
- Safety Statement
- A legally required written document under the Safety, Health and Welfare at Work Act 2005 detailing workplace hazards, risk assessments, and control measures.
- Hazard and Risk
- A hazard is anything with potential to cause harm; risk is the likelihood of that harm occurring combined with the severity of its consequences.
- BS 1192
- The standard code of practice governing architectural drawing conventions, line weights, projection symbols, and dimensioning used in Construction Studies.
- Jig
- A purpose-made workshop device designed to hold and locate a workpiece securely and/or guide a tool, ensuring repeated, safe, and accurate operations without cumulative measuring error.
Check yourself
What total mark and percentage share of Higher Level Construction Studies is allocated to the practical test and project coursework combined?
300 marks out of 600 total (50%), split equally as 150 marks (25%) for the Part II Practical Test and 150 marks (25%) for the Part III Project and Coursework.
How does the cap iron on a bench plane prevent wood fibres from tearing out?
It is screwed 1 mm to 2 mm behind the cutting edge on the flat back of the iron; it curls and breaks the wood shaving immediately as it lifts, stopping the shaving from levering up and splitting the timber ahead of the cut.
Why are hand saw teeth set alternately to the left and right?
Tooth setting creates a kerf (cut slot) that is wider than the saw plate itself, preventing the blade from binding or sticking due to friction during sawing.
Name two methods of joining boards edge to edge and state one advantage of each.
A rubbed joint is quick and requires no extra material; a loose tongue joint increases gluing area and keeps the boards flush and aligned during cramping.
Why must the cut edges of MDF be sealed before painting?
The exposed wood fibres are porous and will soak up paint unevenly, causing the edges to swell and create an uneven finish.
What two conditions must be verified to confirm that a four-sided timber frame is square?
Opposite sides must be equal in length, and both corner-to-corner diagonal measurements must be equal.
State two precautions taken during the oven-dry moisture content test to ensure accuracy.
Dry the specimen to constant mass by re-weighing after further heating, and use the same electronic balance throughout the experiment.
In safety legislation, what is the difference between a hazard and a risk?
A hazard is anything with the potential to cause harm; risk is the likelihood of that harm occurring combined with its potential severity.