
Tools and equipment allow you to mark out, cut, shape, and assemble materials accurately and safely. For assessment, you need to choose suitable tools for materials and tasks, and explain their safe use.
Planning and Hand Tools
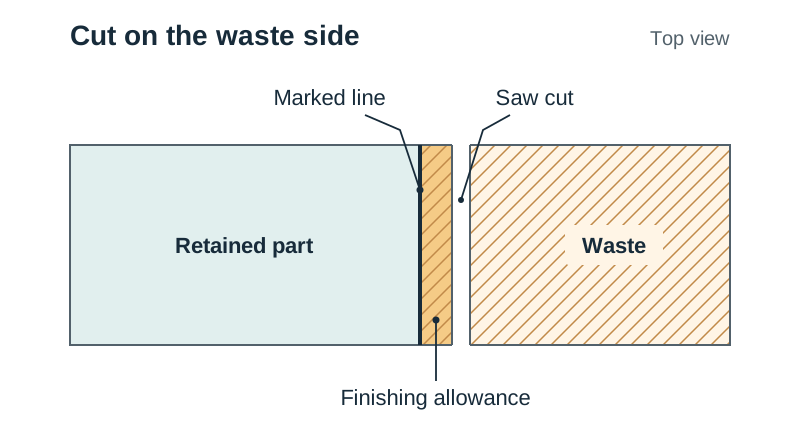
Planning your order of operations prevents costly mistakes: mark out, secure the workpiece, cut on the waste side, shape and smooth, then check your finished dimensions. Hand tools are powered by hand rather than electricity, giving you close control over small, detailed work.
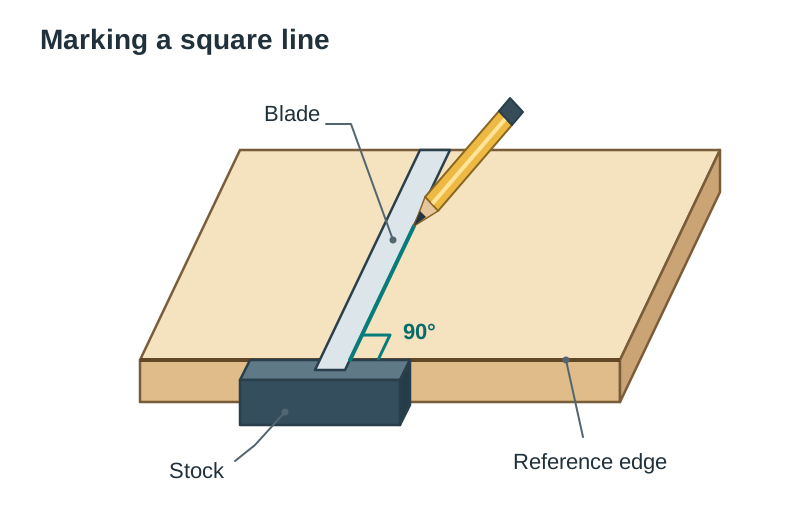
- A steel rule and try square mark straight reference lines and 90-degree angles across workpieces.
- A scriber marks fine layout lines on metals and hard plastics.
- A centre punch creates a small dimple in metal to stop a drill bit wandering.
- Mark acrylic on its protective film instead, as punch impacts crack brittle plastic.
- A tenon saw cuts straight lines in wood; its reinforced back keeps the blade stiff.
- A junior hacksaw cuts small metal sections and thin plastics cleanly.
Holding and Assembly Equipment
Securing work firmly protects your hands and stops workpieces from slipping or spinning during fabrication.
- A bench vice grips timber or metal firmly at the workbench while you saw, file, or chisel.
- A machine vice bolts to a drill table to clamp work securely during drilling.
- A G-cramp holds small parts together, or clamps a workpiece to the bench while adhesive sets.
- A sash cramp pulls wide frames and carcases together while glue cures.
- A soldering iron melts solder to join electronic components to a circuit board.
- Always return the soldering iron to its stand between joints.
- Use fume extraction to capture fumes at the joint.
Matching Tools to Materials
Choosing the correct tool depends on whether you are working with wood, metal, or plastic.
| Task | Wood | Metal | Plastic (e.g. Acrylic) |
|---|---|---|---|
| Straight cut | Tenon saw | Hacksaw (junior hacksaw for small sections) | Junior hacksaw |
| Curved cut | Coping saw | Abrafile or piercing saw | Coping saw or scroll saw |
| Marking out | Pencil and try square | Scriber and try square | Fine marker or scriber |
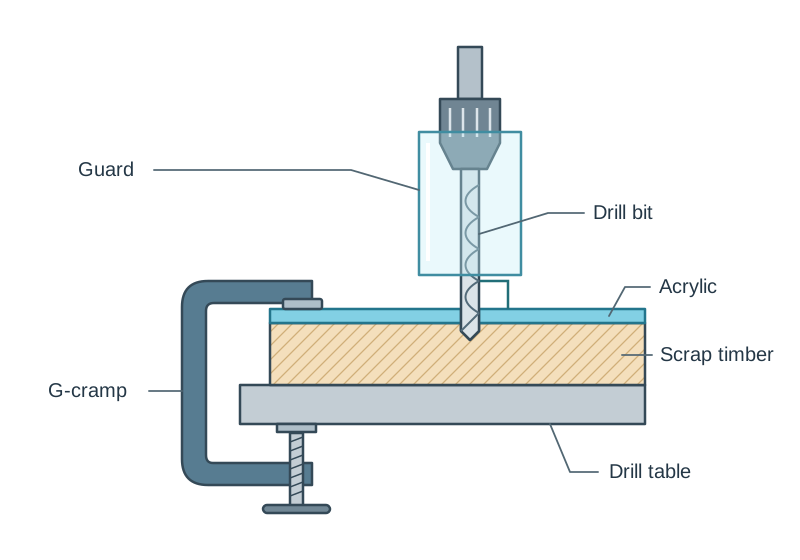
| Hole making | Pillar drill | Centre punch and pillar drill | Pillar drill backed with scrap wood |
| Smoothing | Glasspaper | File or emery cloth | File or wet-and-dry paper |
Cut on the waste side of your marked line, then file or sand back to the line for an accurate fit.
Workshop Machines
Power tools process materials faster than hand tools using mains electricity or rechargeable batteries.
- A pillar drill makes accurate holes square to the work surface; a depth stop can limit drilling depth.
- A scroll saw’s blade moves up and down to cut curves in thin timber and plastics.
- A router cuts grooves and shapes decorative edges in timber using high-speed rotating cutters.
- Clamp work securely in a vice or cramp for drilling.
- On a scroll saw, keep work flat on the table and guide it with hands clear of the blade.
Safety and Care of Tools
Safe workshop routines and good care prevent accidents and keep tools cutting cleanly.
- Wear PPE such as safety glasses to shield your eyes from flying swarf, sparks, and dust.
- Tie long hair back and remove loose jewellery.
- Never wear gloves near rotating spindles; fabric can snag and pull your hand into the cutter.
- Stop the machine completely before clearing swarf with a brush; never use your bare hands.
- Unplug mains tools or remove rechargeable batteries before changing blades or drill bits.
- Inspect electrical cables regularly for damaged insulation.
| Sign | Meaning |
|---|---|
| Blue circle | Mandatory action (e.g. wear eye protection) |
| Yellow triangle | Warning of hazard |
| Green square | Safe condition (e.g. first aid) |
| Red circle with crossbar | Prohibition |
Key terms
- Centre Punch
- A pointed steel tool struck with a hammer to make a starter indentation in metal before drilling.
- Machine Vice
- A mechanical clamp bolted to a machine table to grip workpieces securely during drilling.
- Swarf
- Waste metal chips, curls, or plastic shavings produced during cutting and drilling operations.
- Power Isolation
- Disconnecting a machine from its electrical supply before maintenance, adjustments, or blade changes.
- Personal Protective Equipment (PPE)
- Protective gear, such as safety glasses, worn to prevent injuries in the workshop.
- Marking Out
- Transferring dimensions, cutting lines, and centre points from a drawing onto raw material.
Check yourself
What hand tool makes a starter indentation in metal to stop a drill bit wandering?
A centre punch.
Why should acrylic sheet be backed with scrap timber when drilling on a pillar drill?
The timber supports the underside and reduces cracking or chipping as the drill bit exits.
What does a green square safety sign indicate in a school workshop?
A safe condition or emergency facility, such as a first-aid kit or fire exit.
Name the tool used to pull a wide timber frame together while glue sets.
A sash cramp.
Why must you isolate power before changing a machine blade?
To prevent the machine from accidentally starting up while your hands touch the blade.